SpiceX: From PhantomCamera Research to Lobby GridMap Design
“You can’t build a level if your character feels like a shopping cart. Movement comes first — everything else is decoration.”
The Starting Point
After getting Cleetus retargeted with 40+ animations, the next logical step was testing them in an actual game context. But before any level design could happen, I needed two things locked down:
- A third-person camera system that doesn’t make the player seasick
- A character controller that feels responsive, weighty, and fun
I spent a solid week researching camera solutions and controller architectures. The goal wasn’t to reinvent the wheel — it was to find existing Godot 4.6 tooling that could get us 80% there, then build the last 20% ourselves.
Spoiler: Phantom Camera is cracked. So is the GodotPlush player state machine addon.
What Even Is Phantom Camera?
Phantom Camera (often abbreviated PCam) is a Godot addon that provides a more powerful alternative to the built-in Camera3D node. Instead of hard-coding camera behavior in scripts, you define camera “targets” and “properties” that the addon interpolates between.
Think of it like this: the built-in Camera3D is a manual transmission — direct, powerful, but you have to manage every gear shift yourself. Phantom Camera is an automatic with sport mode — smooth interpolation, built-in follow logic, dead zones, and lookahead, but you can still grab the wheel when you need to.
For SpiceX, I needed two camera modes:
- Third-person follow (TP) — camera trails behind Cleetus, orbits with mouse input
- First-person view (FP) — for tight corridors and cinematic moments
Phantom Camera handles the interpolation between these two modes natively. No lerp math. No quaternion headaches. Just two PhantomCamera3D nodes and a single Camera3D that gets “overridden” by whichever PCam is active.
Step 1: Setting Up the Dual Camera System
The first attempt at the camera rig used Phantom Camera’s follow + look-at modes simultaneously.
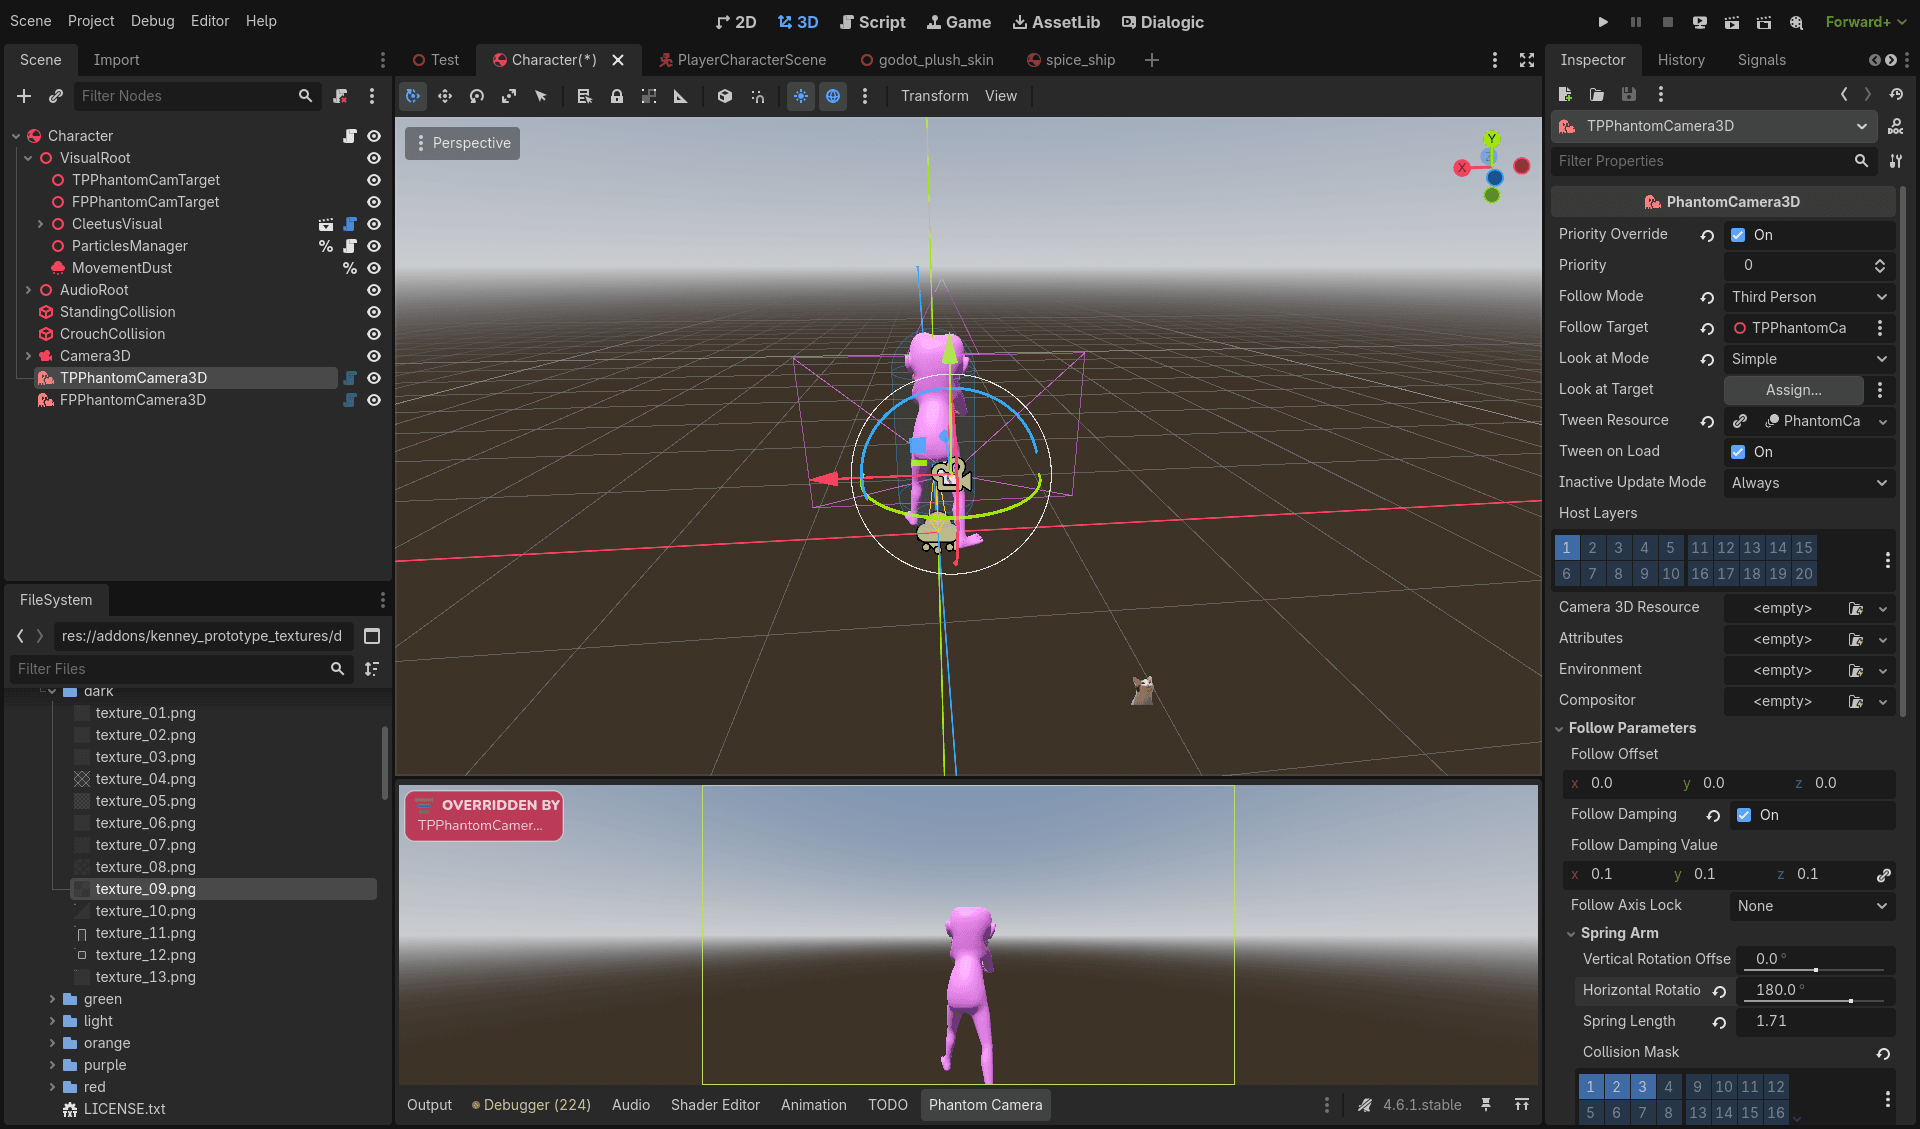
What’s happening in this screenshot:
The scene tree shows the full character hierarchy:
- Character (root)
- VisualRoot
TPPhantomCamTarget— target node for third-person camera positioningFPPhantomCamTarget— target node for first-person camera positioningCleetusVisual— the actual VRM character mesh- ParticlesManager
MovementDust— particle effect for ground movement (has a%symbol indicating it’s an internal/autoload node)
- AudioRoot
StandingCollisionCrouchCollisionCamera3DTPPhantomCamera3D— the active third-person PCam (selected, highlighted in blue)FPPhantomCamera3D
- VisualRoot
The inspector panel on the right would show PCam properties (not fully visible here): follow mode, dead zones, damping values, and catchup speed.
The camera preview at the bottom shows what the player sees: a third-person view from behind Cleetus (pink humanoid visible), with the pink “OVERRIDDEN BY TPPhantomCamera3D” label confirming the PCam is controlling the Camera3D.
The viewport shows Cleetus on the brown prototype grid floor (using Kenney’s dark prototype texture set — texture_09.png is selected in the FileSystem panel). A wireframe camera frustum shows the camera’s field of view.
Key takeaway: The dual-PCam setup lets me switch between first and third person by simply toggling which PhantomCamera3D node is “active.” The Camera3D node gets overridden by whichever PCam has priority. Clean architecture.
Step 2: The GodotPlush Player Controller Addon
While researching camera solutions, I stumbled on the GodotPlush player controller — a complete third-person controller package with state machine architecture, orbital camera, and visual effects built in.
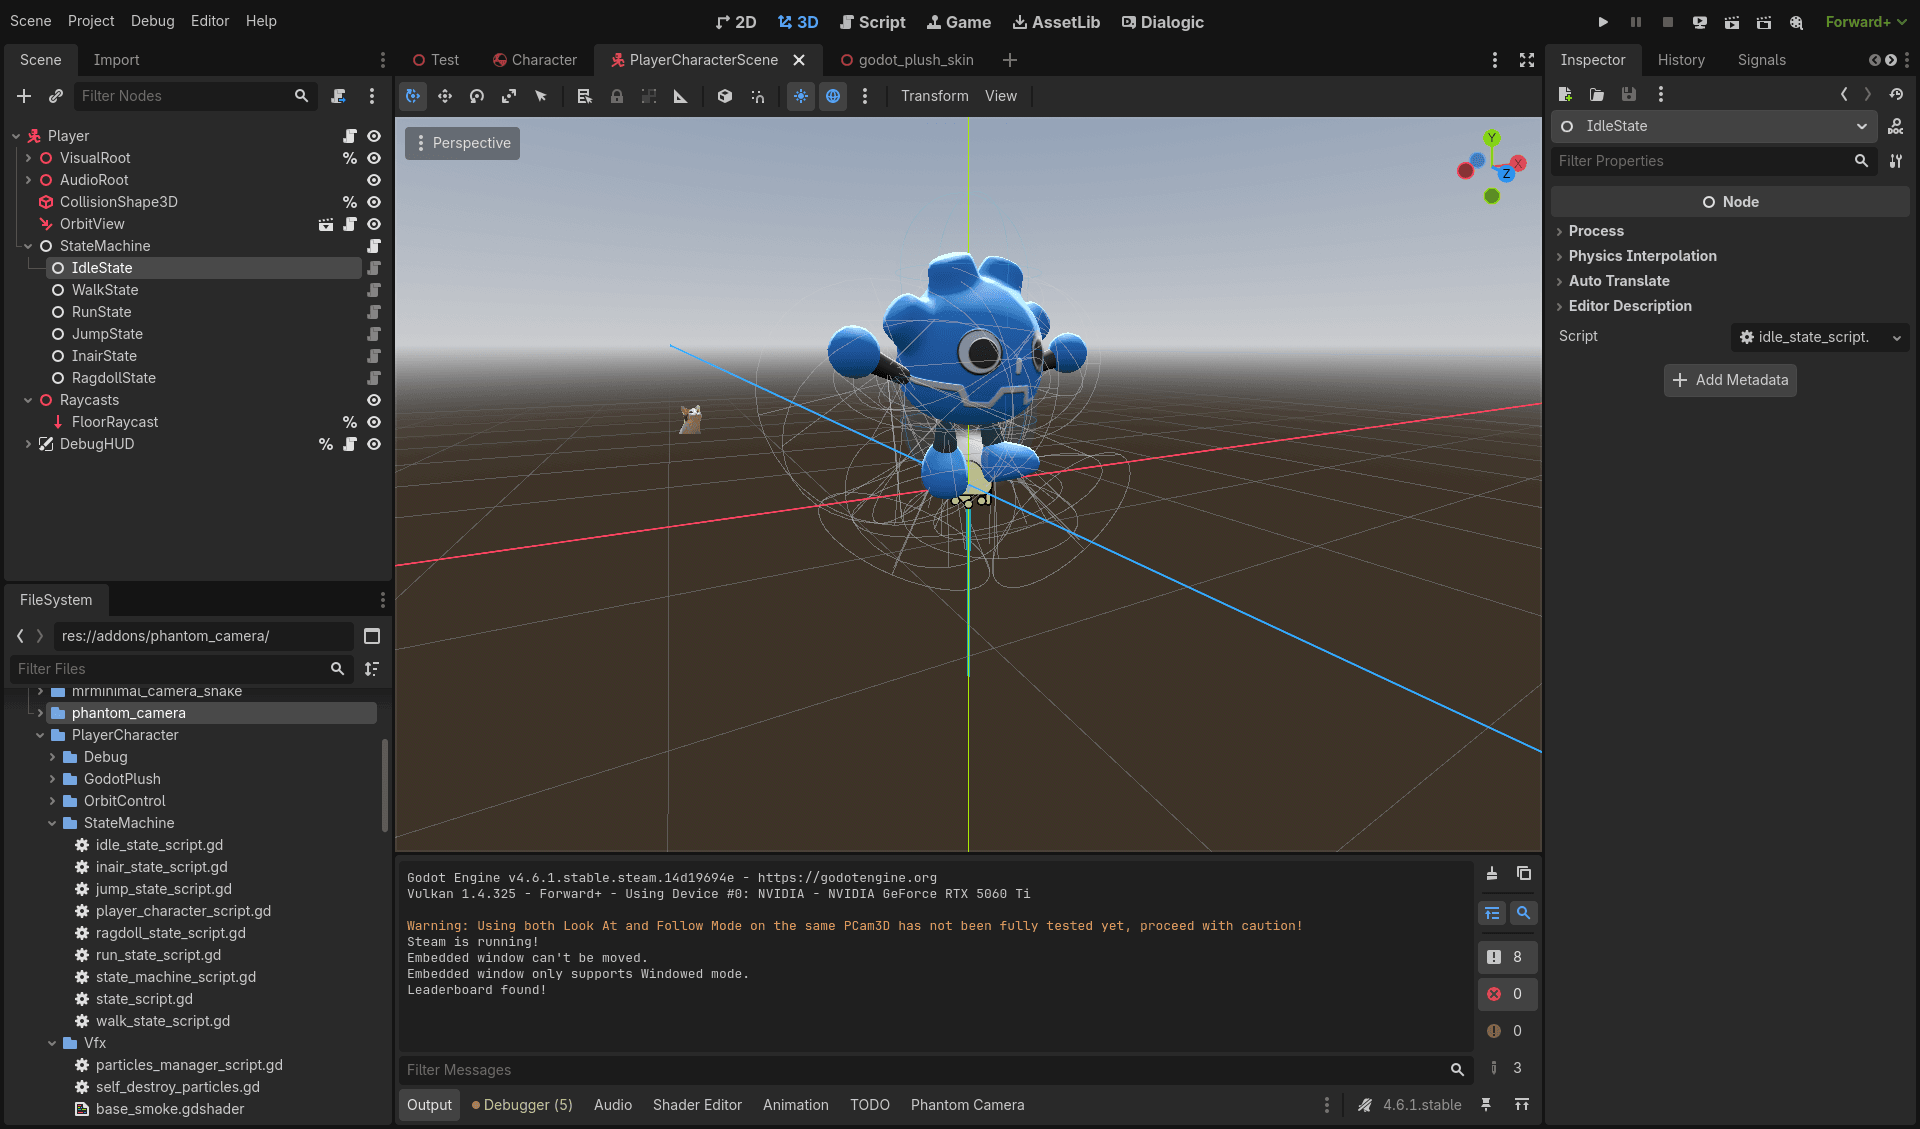
What’s happening in this screenshot:
The scene tree shows the Player scene with a full state machine:
- Player (root)
VisualRootAudioRootCollisionShape3DOrbitView- StateMachine (expanded)
IdleState— currently selected (highlighted)WalkStateRunStateJumpStateInairStateRagdollState
- Raycasts (expanded)
FloorRaycast
DebugHUD
The StateMachine node contains individual state nodes. Each state is its own scene with a script inheriting from a base player_state_script.gd. This is classic state machine pattern: each state handles its own enter, update, exit logic, and transitions to other states based on input or physics conditions.
The FileSystem panel shows the addon structure under res://addons/phantom_camera/PlayerCharacter/:
- StateMachine/ folder with all state scripts:
idle_state_script.gdinair_state_script.gdjump_state_script.gdplayer_state_script.gd(base class)ragdoll_state_script.gdrun_state_script.gdstate_machine_script.gd(the state machine controller)state_script.gdwalk_state_script.gd
- Vfx/ folder with particle and shader effects:
particles_manager_script.gdself_destroy_particles.gdbase_smoke.gdshader
The Inspector on the right shows the IdleState node is selected, with its script idle_state_script.gd assigned. The Output log at the bottom shows:
Warning: Using both Look At and Follow Mode on the same PCam3D has not been fully tested yet, proceed with caution!Why this matters: The state machine pattern means each movement state is isolated. When Cleetus goes from idle → walk → run → jump → in-air → ragdoll, each transition is a clean handoff. No spaghetti code. No boolean flags like is_jumping = true that accidentally stay stuck.
The blue plushie in the viewport is the Godot mascot character that comes with the addon — used as a placeholder test character. It’s surrounded by wireframe spheres showing collision and bone influence.
Step 3: Controller Code — PID vs CharacterBody3D
I experimented with two controller architectures before settling on one.
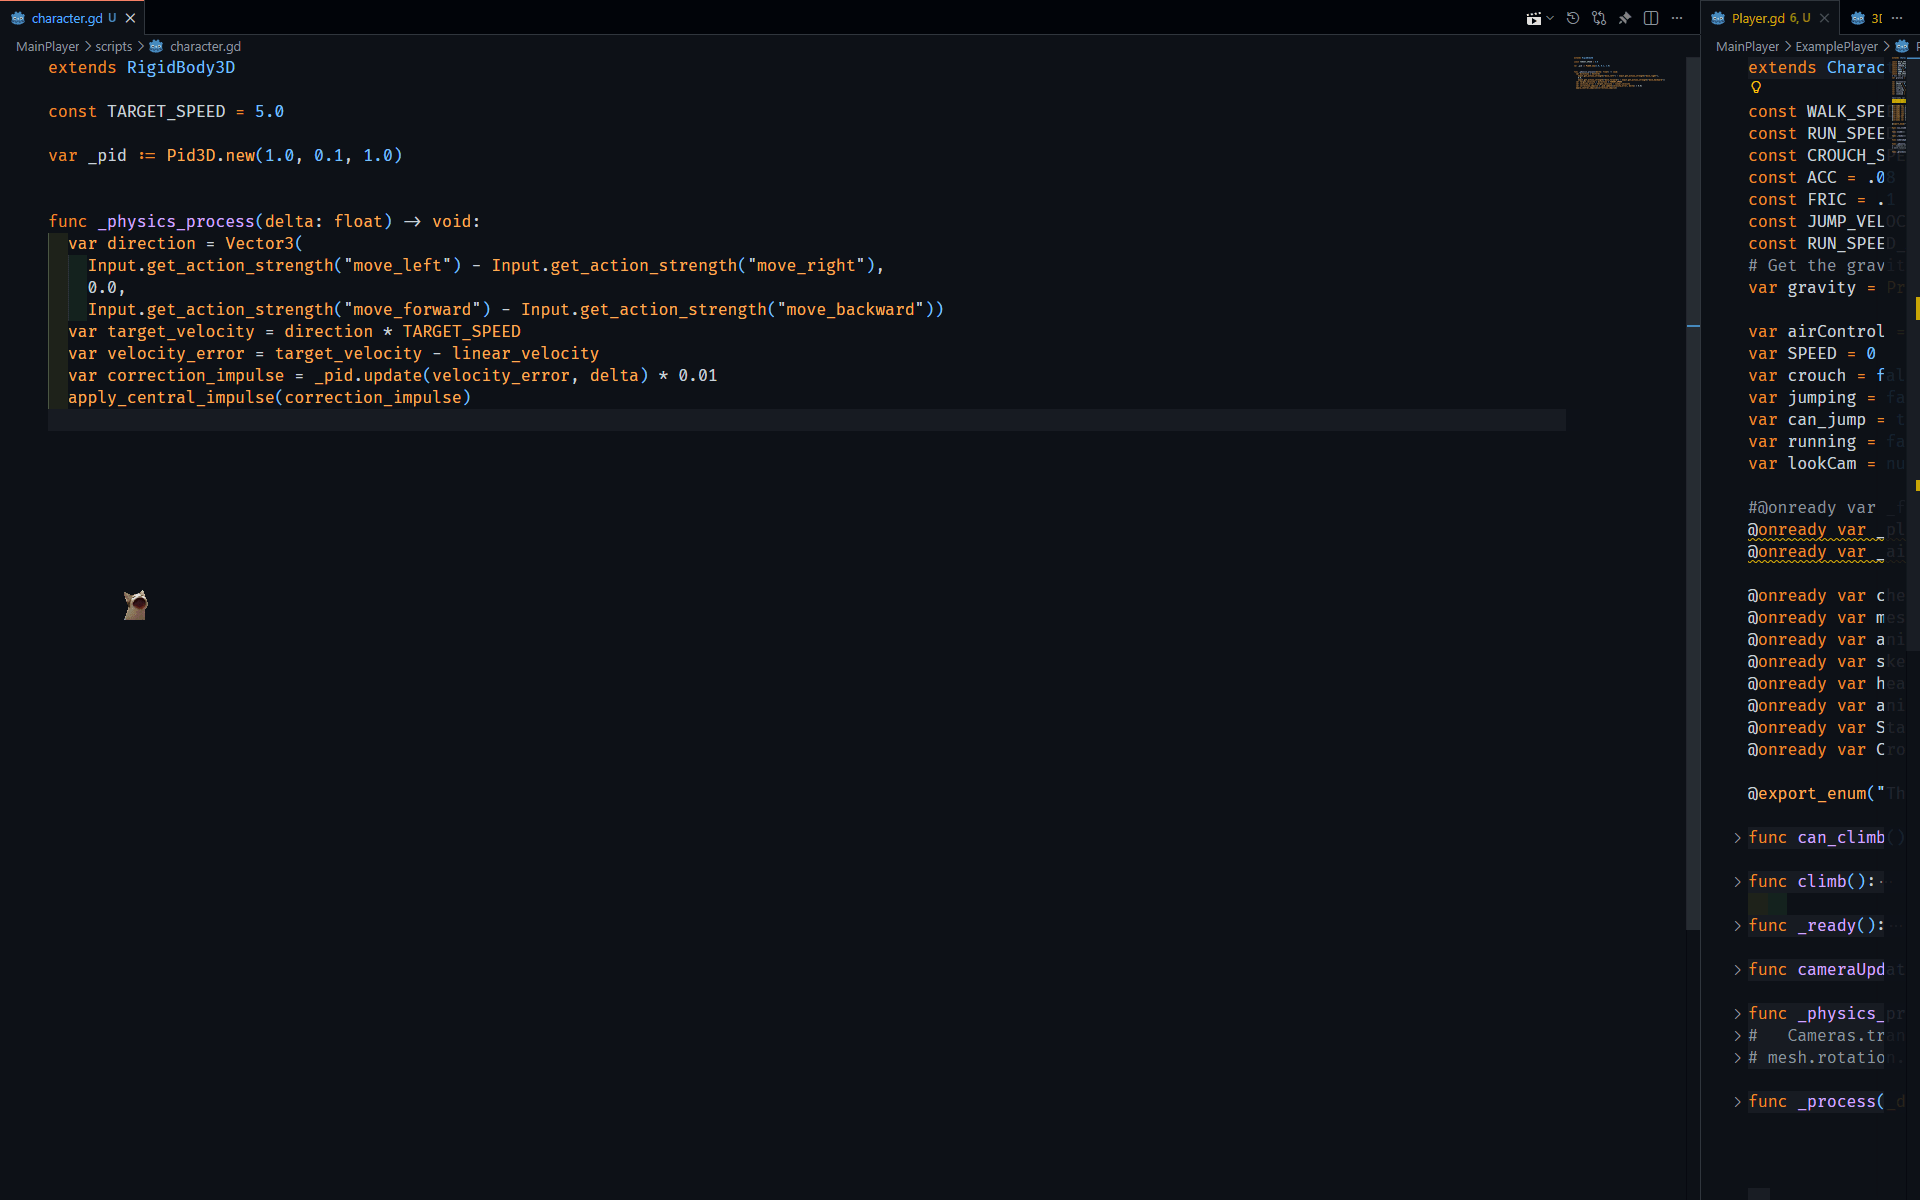
What’s happening in this screenshot:
The screen is split into two code panels showing different controller approaches:
Left panel — character.gd (PID RigidBody3D controller):
extends RigidBody3D

const TARGET_SPEED = 5.0

var _pid := Pid3D.new(1.0, 0.1, 1.0)

func _physics_process(delta: float) -> void:
    var direction = Vector3(
        Input.get_action_strength("move_left") - Input.get_action_strength("move_right"),
        0.0,
        Input.get_action_strength("move_forward") - Input.get_action_strength("move_backward"))
    var target_velocity = direction * TARGET_SPEED
    var velocity_error = target_velocity - linear_velocity
    var correction_impulse = _pid.update(velocity_error, delta) * 0.01
    apply_central_impulse(correction_impulse)
This is a PID controller (Proportional-Integral-Derivative) applied to a RigidBody3D. Instead of directly setting velocity, it calculates the difference between desired velocity (target_velocity) and actual velocity (linear_velocity), then applies a physics impulse to close that gap. The PID parameters (1.0, 0.1, 1.0) tune how aggressively it corrects.
Right panel — Player.gd (CharacterBody3D state machine controller):
Partially visible code showing a more traditional approach:
extends Charac[terBody3D]

const WALK_SPEED = ...
const RUN_SPEED = ...
const CROUCH_SPEED = ...
const ACC = 5.0
const FRIC = 5.0
const JUMP_VEL = ...
const RUN_SPEED = ...

var gravity = ...
var airControl = ...
var SPEED = 0
var crouch = false
var jumping = false
var can_jump = ...
var running = false
var lookCam = null

@onready var ...  # (multiple node references)

func can_climb(): ...
func climb(): ...
func _ready(): ...
func cameraUpdate(): ...
func _physics_process(): ...
func _process(): ...
This is the more traditional Godot approach using CharacterBody3D with explicit state management. Note the yellow squiggly underlines on @onready var lines — these are GDScript warnings (possibly unused variables or missing type hints).
The verdict: The PID controller is elegant for physics simulations, but the CharacterBody3D + state machine combo gives us more predictable platformer-style movement with built-in floor snapping, slope handling, and move_and_slide(). For SpiceX — a 3D action-adventure — we went with the CharacterBody3D approach but borrowed the state machine architecture from the GodotPlush addon.
Step 4: Early Character Test Scene
Before any level design, I dropped the character into a basic test scene to validate movement feel.
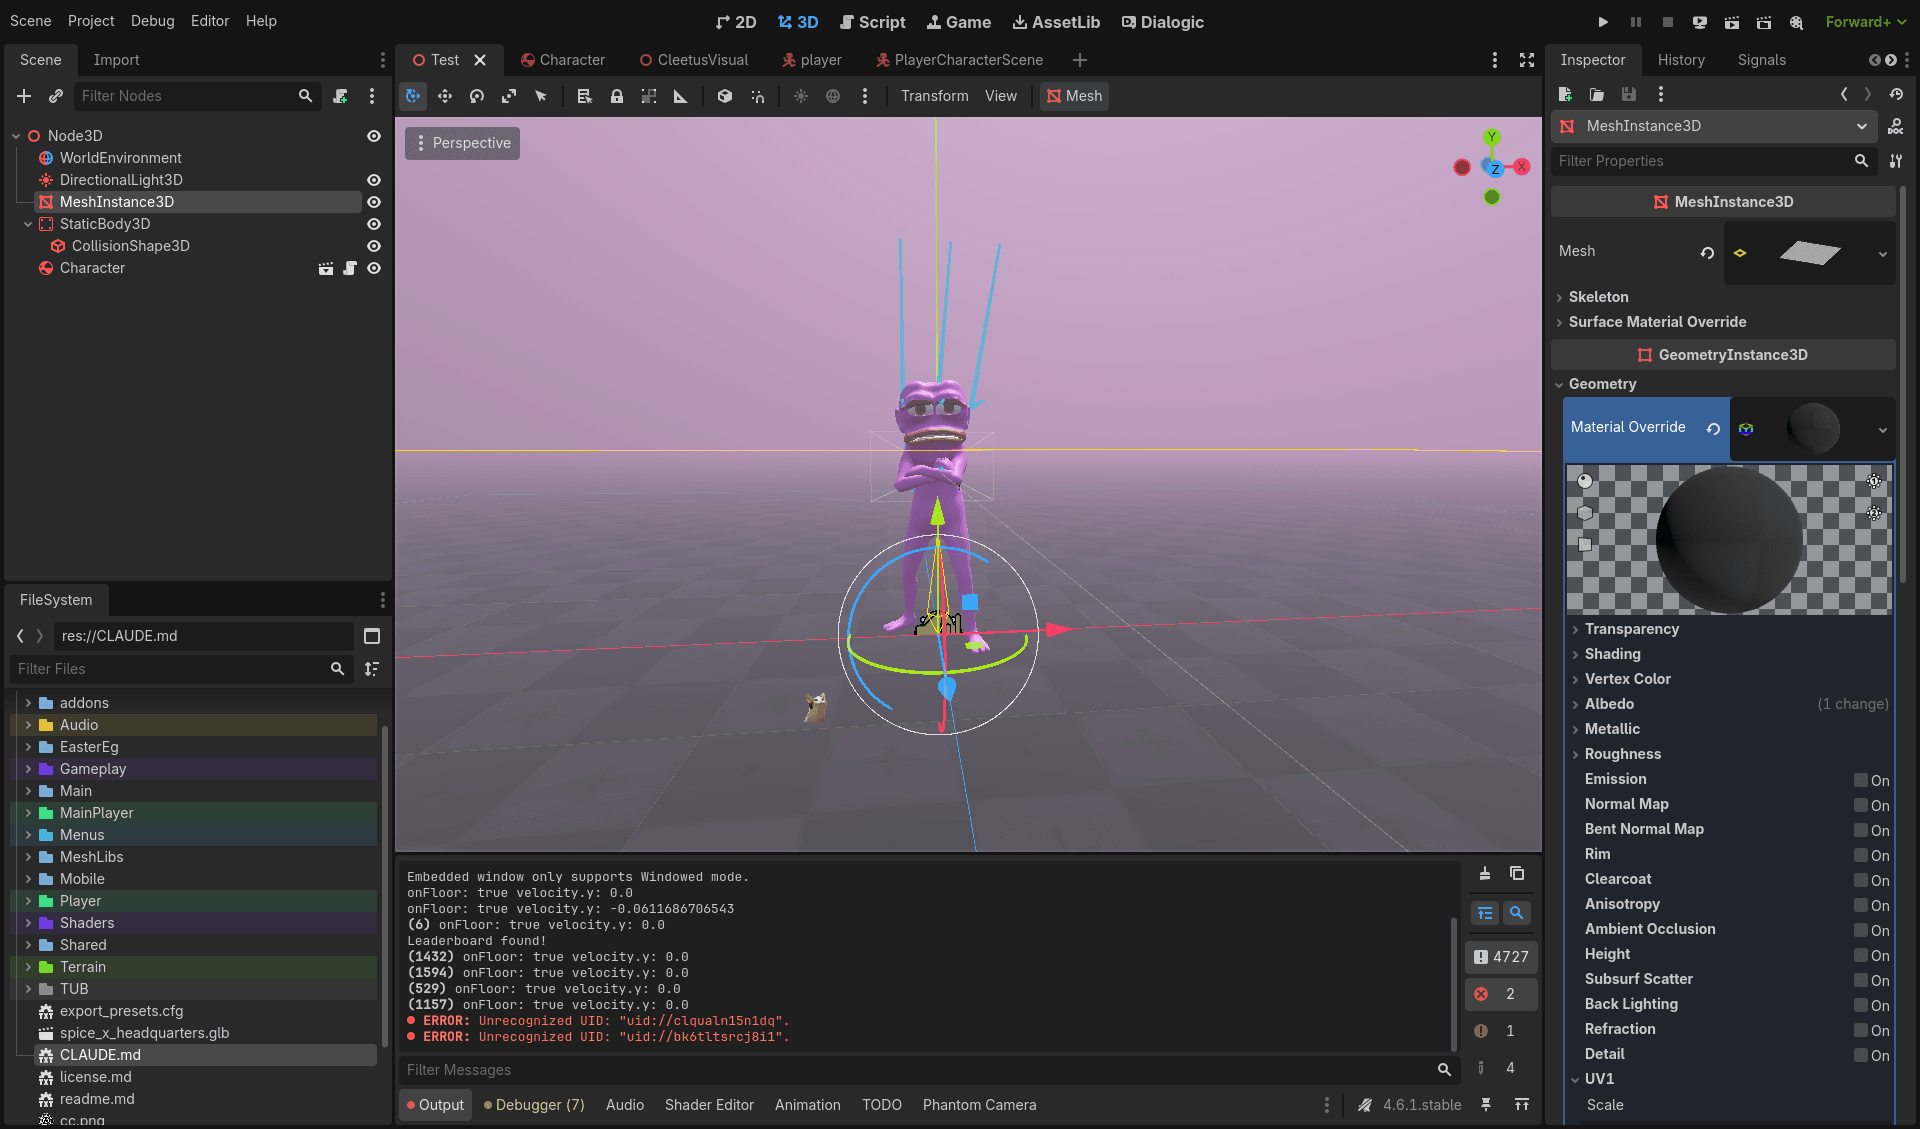
What’s happening in this screenshot:
The scene shows a purple humanoid character (early Cleetus or test model?) standing at the world origin with arms crossed. It wears narrow sunglasses and has two long antennae/horn-like protrusions on its head. A 3D transform gizmo at its feet shows the axes.
The scene tree on the left:
- Node3D (root)
WorldEnvironmentDirectionalLight3DMeshInstance3D(selected, with pink icon — this is the purple character)- StaticBody3D
CollisionShape3D
Character(with camera icon)
The Output log at the bottom shows physics debug info:
onFloor: true velocity.y: 0.0
onFloor: true velocity.y: -0.0611686706543
(6) onFloor: true velocity.y: 0.0
Leaderboard found!
This is real-time floor collision detection. The velocity.y values near zero confirm the character is grounded. The “Leaderboard found!” message is from an integration (possibly Steam or a testing service).
Two red error messages at the bottom:
ERROR: Unrecognized UID: "uid://c1qquinl..."This is a common Godot 4.x issue where a resource reference got out of sync. Usually fixed by re-saving the scene or reimporting the asset.
FileSystem shows the project root with:
spice_x_headquarters.glb— the HQ building model!CLAUDE.md— project notes- Various folders:
Audio,EasterEg,Gameplay,Main,MainPlayer,Menus,MeshLibs,Player,Shaders,Shared…
The viewport shows this is scene tab “Test” (active) with other tabs: Character, CleetusVisual, player, PlayerCharacterScene.
Step 5: Lobby GridMap — The Blank Canvas
With movement feeling good, it was time to build Level 1: The Lobby.
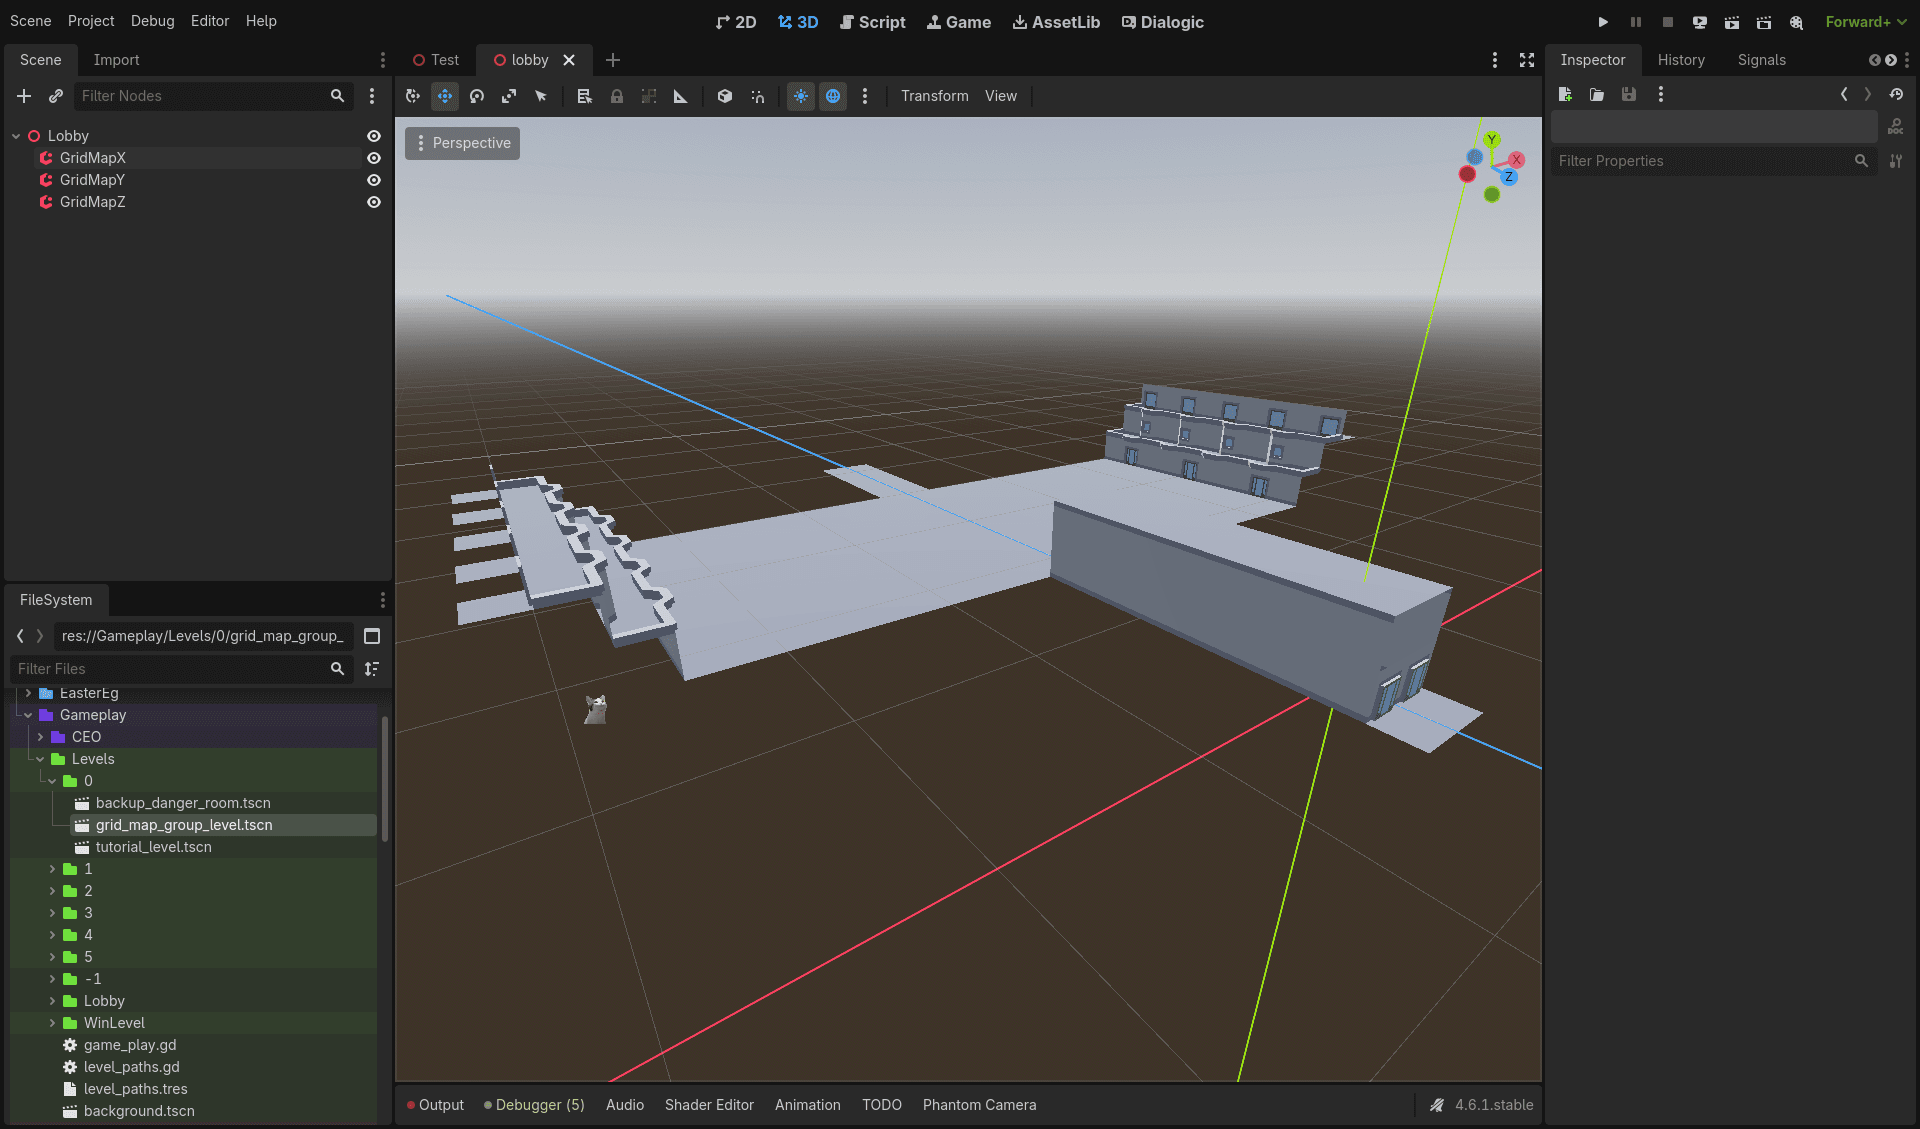
What’s happening in this screenshot:
The Lobby scene is open (tab active). The scene tree:
- Lobby (root)
GridMapX(with orange icon — GridMap node for X-axis tile placement)GridMapY(orange icon)GridMapZ(orange icon)
Three separate GridMap nodes are used for different axes/layers of the level. GridMap is Godot’s tile-based 3D mesh instancing tool — like a 3D tilemap but with meshes.
The FileSystem shows the level organization:
Gameplay/Levels/0/contains:backup_danger_room.tscngrid_map_group_level.tscn(selected, highlighted in green)tutorial_level.tscn
Gameplay/Levels/1/through5/,-1/,Lobby/— level foldersWinLevel/with gameplay scripts
The 3D viewport shows the actual lobby blockout:
- A large central platform/ramp with stepped stairs on the left
- An elevated rectangular block on the right with a smaller structure behind it
- The environment is a grayboxed blockout — simple shapes showing layout without final art
- Background is complete black void — no skybox loaded yet, this is pure level geometry
- The GridMap editing mode is active, with orange grid lines showing placement guides
Why three GridMaps? Likely organizing different tile types or layers. Maybe GridMapX handles floor tiles, GridMapY handles walls, GridMapZ handles props. Or each GridMap could represent a different material/layer of the level. This keeps the level modular and easier to edit.
Step 6: The Tile Palette — Modular Wall Pieces
The final piece: building the actual tileset for the lobby walls.
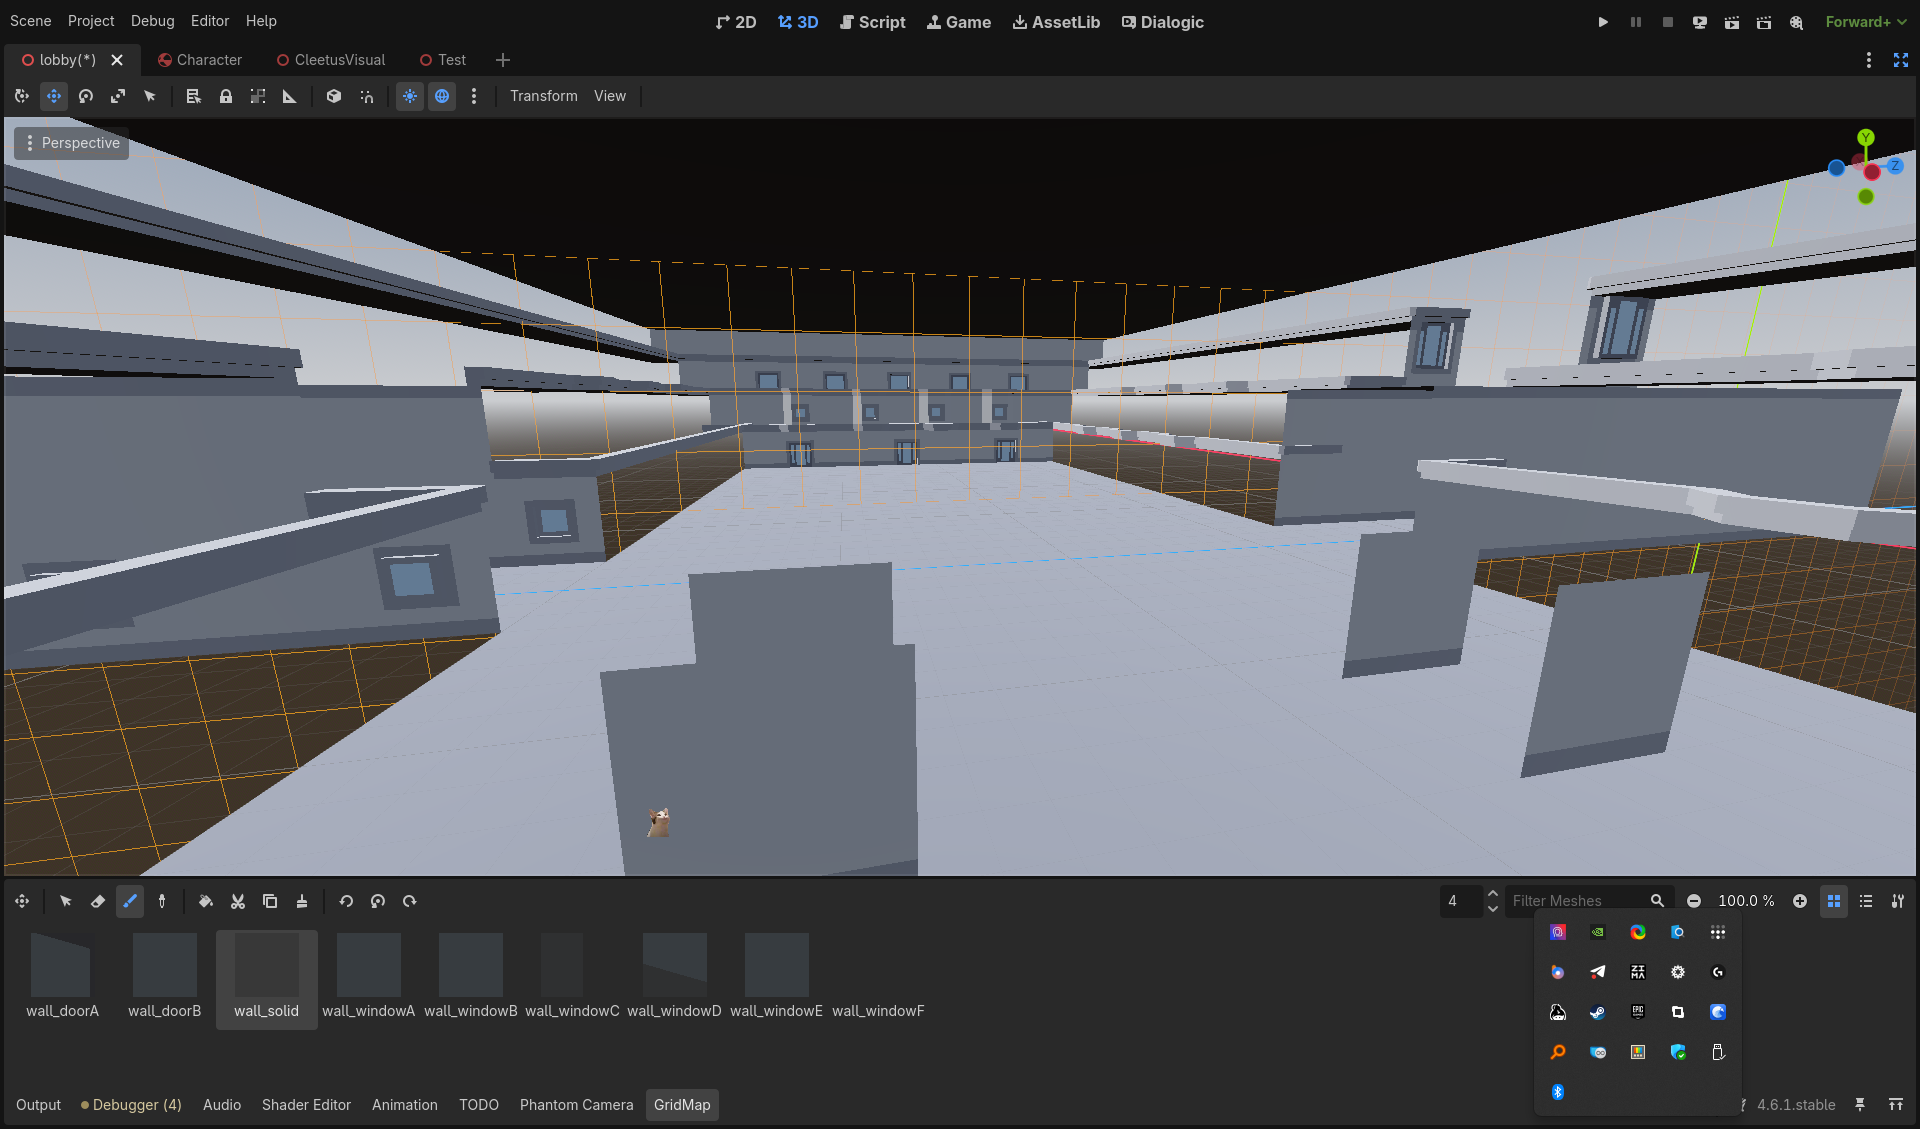
What’s happening in this screenshot:
The GridMap editor tab is active at the bottom. The tile palette shows modular wall pieces:
wall_doorAwall_doorBwall_solid(currently selected — highlighted with a lighter border)wall_windowAwall_windowBwall_windowCwall_windowDwall_windowEwall_windowF
The viewport shows the same lobby blockout from a different angle — a multipart interior courtyard or multiplayer lobby with:
- Multiple raised walkways and balconies
- Rectangular pillars and wall segments
- A distant structure with window cutouts
- An orange dashed selection outline showing the current GridMap brush placement area
- A tiny character model on a pedestal near the center — likely a player spawn/reference
The scene tab shows lobby(*) active with unsaved changes (asterisk). Other tabs: Character, CleetusVisual, Test.
The blockout philosophy: This is the “graybox” stage — no final textures, no lighting, just pure level layout. The goal is testing:
- How does it feel to walk around the lobby?
- Are sight lines good for a multiplayer spawn area?
- Do the door placements make sense for level flow?
- Where should pickups, NPCs, or interactive elements go?
Once the layout is validated, the graybox meshes will be replaced with final art assets.
The Research-to-Design Pipeline
Here’s how the whole process flowed, start to finish:
Phase 1: RESEARCH (Days 1–3)
├── Found Phantom Camera addon (dual TP/FP camera system)
├── Discovered GodotPlush player controller + state machine
├── Tested PID controller vs CharacterBody3D approaches
└── Decision: CharacterBody3D + state machine for SpiceX

Phase 2: PROTOTYPING (Days 4–5)
├── Built test scene with purple character placeholder
├── Validated physics (floor detection, velocity, collisions)
├── Fixed UID/resource errors
└── Confirmed movement "feel" — responsive, weighty, fun

Phase 3: LEVEL DESIGN (Days 6–7)
├── Created Lobby scene with 3 GridMap nodes
├── Designed grayboxed layout (ramps, platforms, walkways)
├── Built modular tileset (solid walls, door variants, window variants)
└── Currently iterating on layout flow
What We Learned
Phantom Camera > Manual Camera Code
The built-in Godot camera is powerful, but Phantom Camera saves SO much time. The interpolation, follow dead zones, and mode switching are production-ready out of the box. Unless you have very specific camera requirements, use an addon.
State Machines Are Non-Negotiable
The GodotPlush addon’s state machine architecture was a revelation. Having IdleState, WalkState, RunState, JumpState, InairState as separate nodes means:
- Clean code — no spaghetti boolean flags
- Easy debugging — select a state node and see its properties
- Scalable — adding
SwimStateorClimbStateis trivial
PID Controllers Are Cool But Overkill
The PID-based RigidBody3D controller is elegant for physics-centric games (like a hovercraft or spaceship). For grounded platformer/character movement, CharacterBody3D + explicit state management is more predictable.
GridMap Is Level Design Speedrun Tech
Building the lobby with GridMap tiles took maybe 2 hours. Building the same geometry manually (placing individual MeshInstance3D nodes) would’ve taken a full day. GridMap’s tile-based approach also makes iteration super fast — swap a wall piece for a door variant with two clicks.
The Result
After a week of research and prototyping, SpiceX now has:
- ✅ Working third-person camera (TP) with Phantom Camera
- ✅ First-person camera (FP) ready for cinematic moments
- ✅ Character controller with state machine (idle/walk/run/jump/in-air/ragdoll)
- ✅ Test scene validating movement physics
- ✅ Lobby level blockout with GridMap modular tiles
- ✅ Tile palette with wall variants (solid, doorA/B, windowA–F)
Cleetus can now run, jump, and explore the lobby. The grayblock layout feels good for a multiplayer spawn area. Next step: replacing the graybox with actual SpiceX facility art.
But that’s a story for next devlog.
“First they teach you how to walk. Then they teach you how to run. Then you realize the facility has no exit.”
— Cleetus 🤡
Links:
- Phantom Camera for Godot — The addon that saved my camera code
- GodotPlush Player Controller (if public — adjust link as needed)
- Kenney Prototype Textures — Grid floor textures
- SpiceX Animation Pipeline — Previous devlog on retargeting
- SpiceX Devlog Series — All posts