SpiceX: Retargeting Animations from Mesh2Motion to VRM in Godot 4.6
“Free animations are great. Free animations that actually fit your character’s skeleton? That’s where the real work begins.”
The Situation
Cleetus needed to move. Not just hobble around like a broken action figure — he needed to run, jump, swing swords, cast spells, swim, and hold a pistol like he means it.
The problem? Building a full animation library from scratch would take months. Buying mocap data would cost more than my entire gamedev budget. Then I remembered Mesh2Motion exists — a free repository of high-quality humanoid animations ripped from various motion datasets.
The catch? Those animations were built for a standard humanoid skeleton. Cleetus is a VRM avatar — which means his bone hierarchy is slightly different. Different bone names, different roll values, different rest poses.
This is the story of how I bridged that gap.
What Even Is Retargeting?
Before we dive in, let’s get on the same page about what retargeting actually means.
Retargeting is the process of taking an animation built for one skeleton (the source) and making it work on a different skeleton (the target). It’s not just copying keyframes from Bone A to Bone A — because what if your target skeleton doesn’t HAVE a Bone A? What if their hips are named differently? What if the arm bone roll values are flipped?
In game engines, retargeting typically involves:
- Bone Mapping — creating a dictionary that says “source skeleton’s
mixamorig:Hipsmaps to target skeleton’sJ_Sec_Hips” - Pose Normalization — making sure both skeletons are in the same reference pose (usually T-pose or A-pose)
- Rotation Correction — fixing bone roll differences that make limbs spin like helicopter blades
- Scale Compensation — adjusting for height/arm-length differences between characters
For Cleetus, I handled the bone mapping and rotation correction in Blender, then handled the rest in Godot.
Step 1: The Blender NLA Editor — Setting Up the Bone Map
The journey starts in Blender with the Nonlinear Animation (NLA) editor. I imported the raw Mesh2Motion animation data — which comes as a single GLB packed with dozens of actions — and set up a bone map to translate between the source humanoid rig and Cleetus’s VRM skeleton.
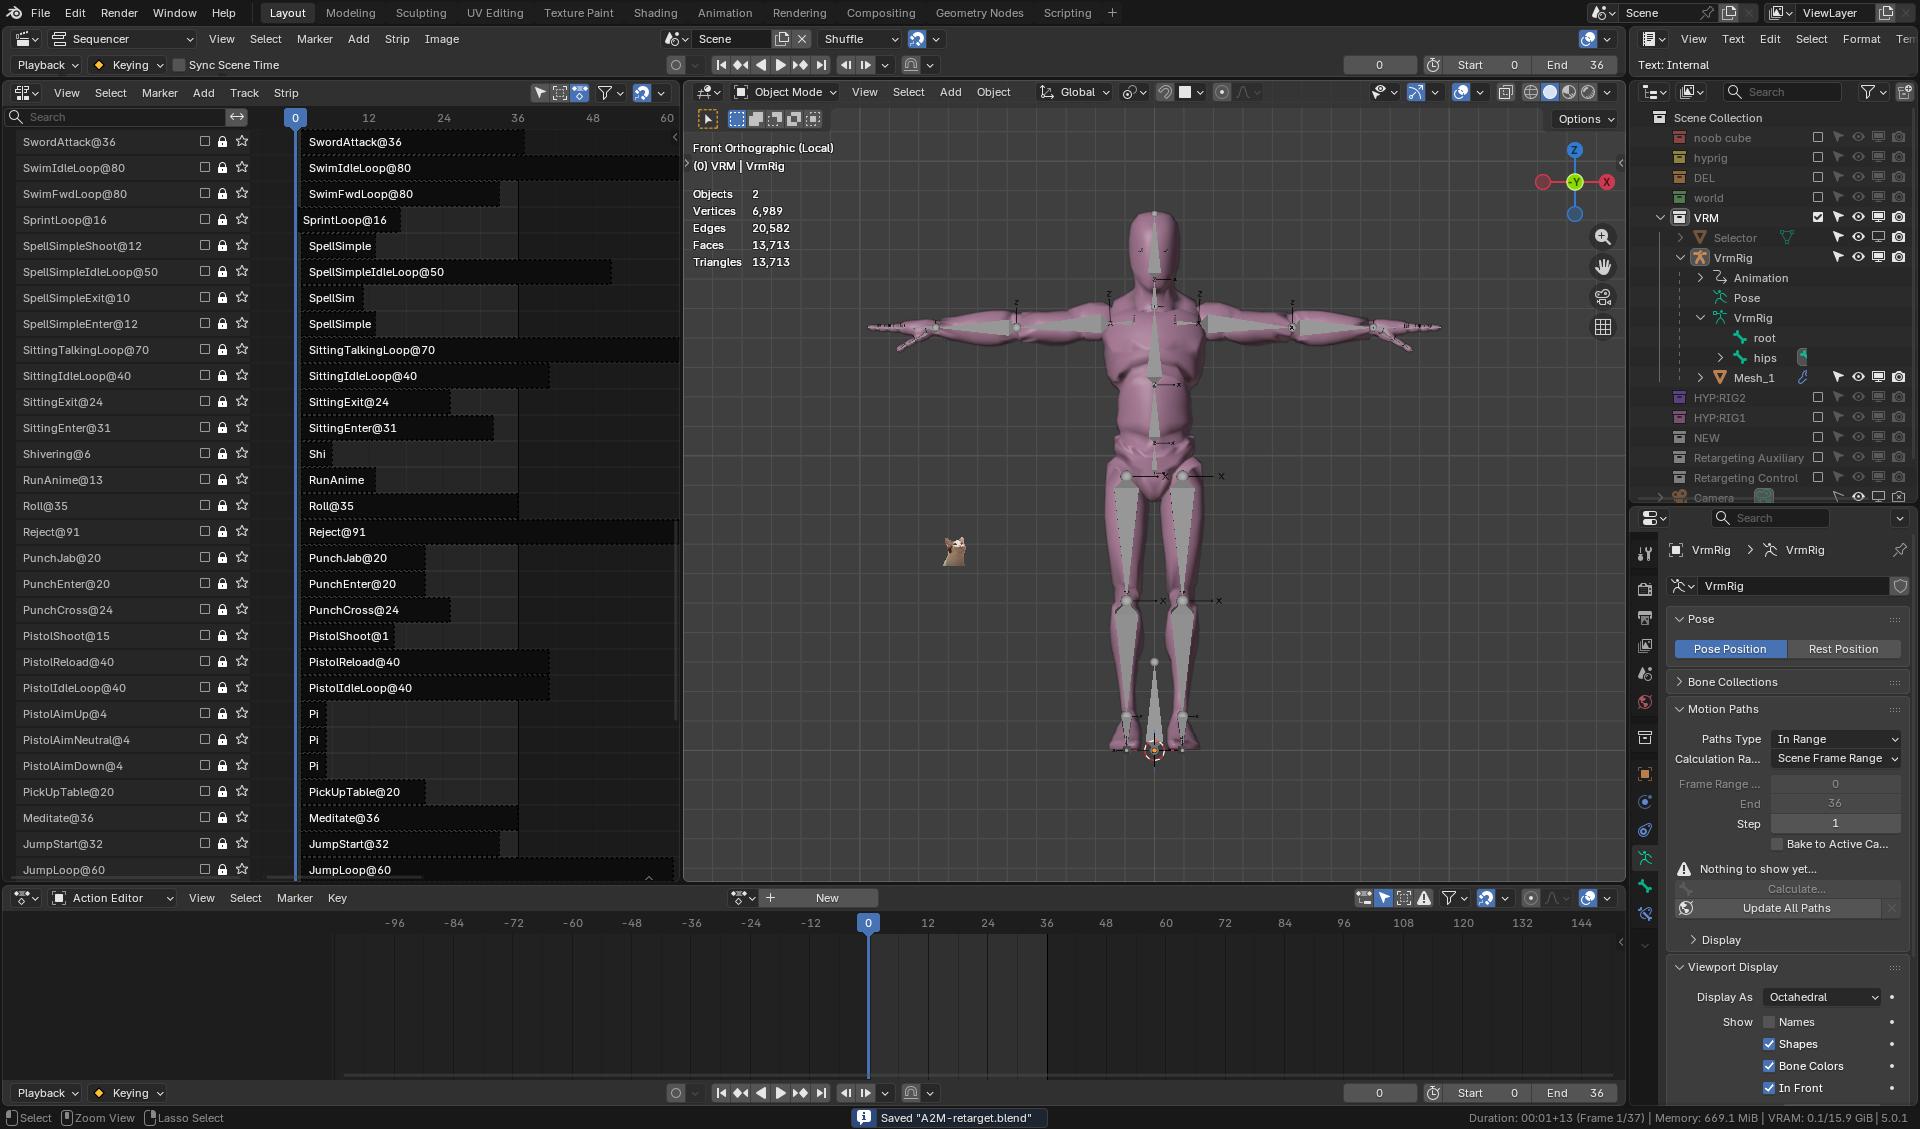
The NLA editor became our animation command center. Each strip is a different action — SwordAttack, SwimFwdLoop, SpellSimpleIdleLoop, PistolReload, Meditate, JumpLoop — all stacked and ready for processing.
What’s happening in this screenshot:
The left panel lists every action from the Mesh2Motion library. I can see action names like:
SwordAttack@36— a 36-frame sword attackSwimIdleLoop@80/SwimFwdLoop@80— swimming animationsSpellSimpleShoot@12/SpellSimpleIdleLoop@50— spell castingSittingTalkingLoop@70/SittingIdleLoop@24— sitting interactionsRunAnime@13/Roll@35/Reject@91— traversalPunchJab@20/PunchCross@24/PunchEnter@20— unarmed combatPistolAimUp@4/PistolAimNeutral@4/PistolAimDown@4— aimingPistolShoot@15/PistolReload@40/PistolIdleLoop@40— gunplayMeditate@36/PickUpTable@20/JumpStart@32/JumpLoop@60— utilities
The timeline strips on the right show frames roughly 0–6,830. Each dark strip is an animation action positioned at a specific time range on the global timeline.
The bone map is the critical invisible part of this process. Before I could see these animations on Cleetus, I had to create a mapping table: “When the source skeleton rotates the left upper arm, rotate the target skeleton’s corresponding bone too.” For a humanoid skeleton with ~65 bones, this becomes a tedious but necessary process.
Pro tip: Blender’s NLA strips let you non-destructively layer and edit each animation before exporting. Want to trim the first 5 frames of a jump because the feet clip? Just adjust the strip bounds. No need to touch the keyframes.
Step 2: Exporting Unique Clips as .glb
Once the bone map was dialed in and the animations looked correct on Cleetus’s skeleton, I sliced everything into individual .glb files — one per animation. This keeps Godot happy because:
- Godot imports
.glbnatively and handles skeleton data well - Each file represents one clean animation clip
- No risk of animation data bleeding between actions
I used a consistent naming convention:
SwordBlock_29.glb
SpellSimpleIdleLoop_50.glb
SprintLoop_16.glb
JumpStart_32.glb
The number suffix is the frame count — super useful for syncing blend times later.
Step 3: Importing Into Godot — The anim-lib.glb
I packed all those individual clips back into a single master library called anim-lib.glb and dropped it into the project under res://Shared/animations/.
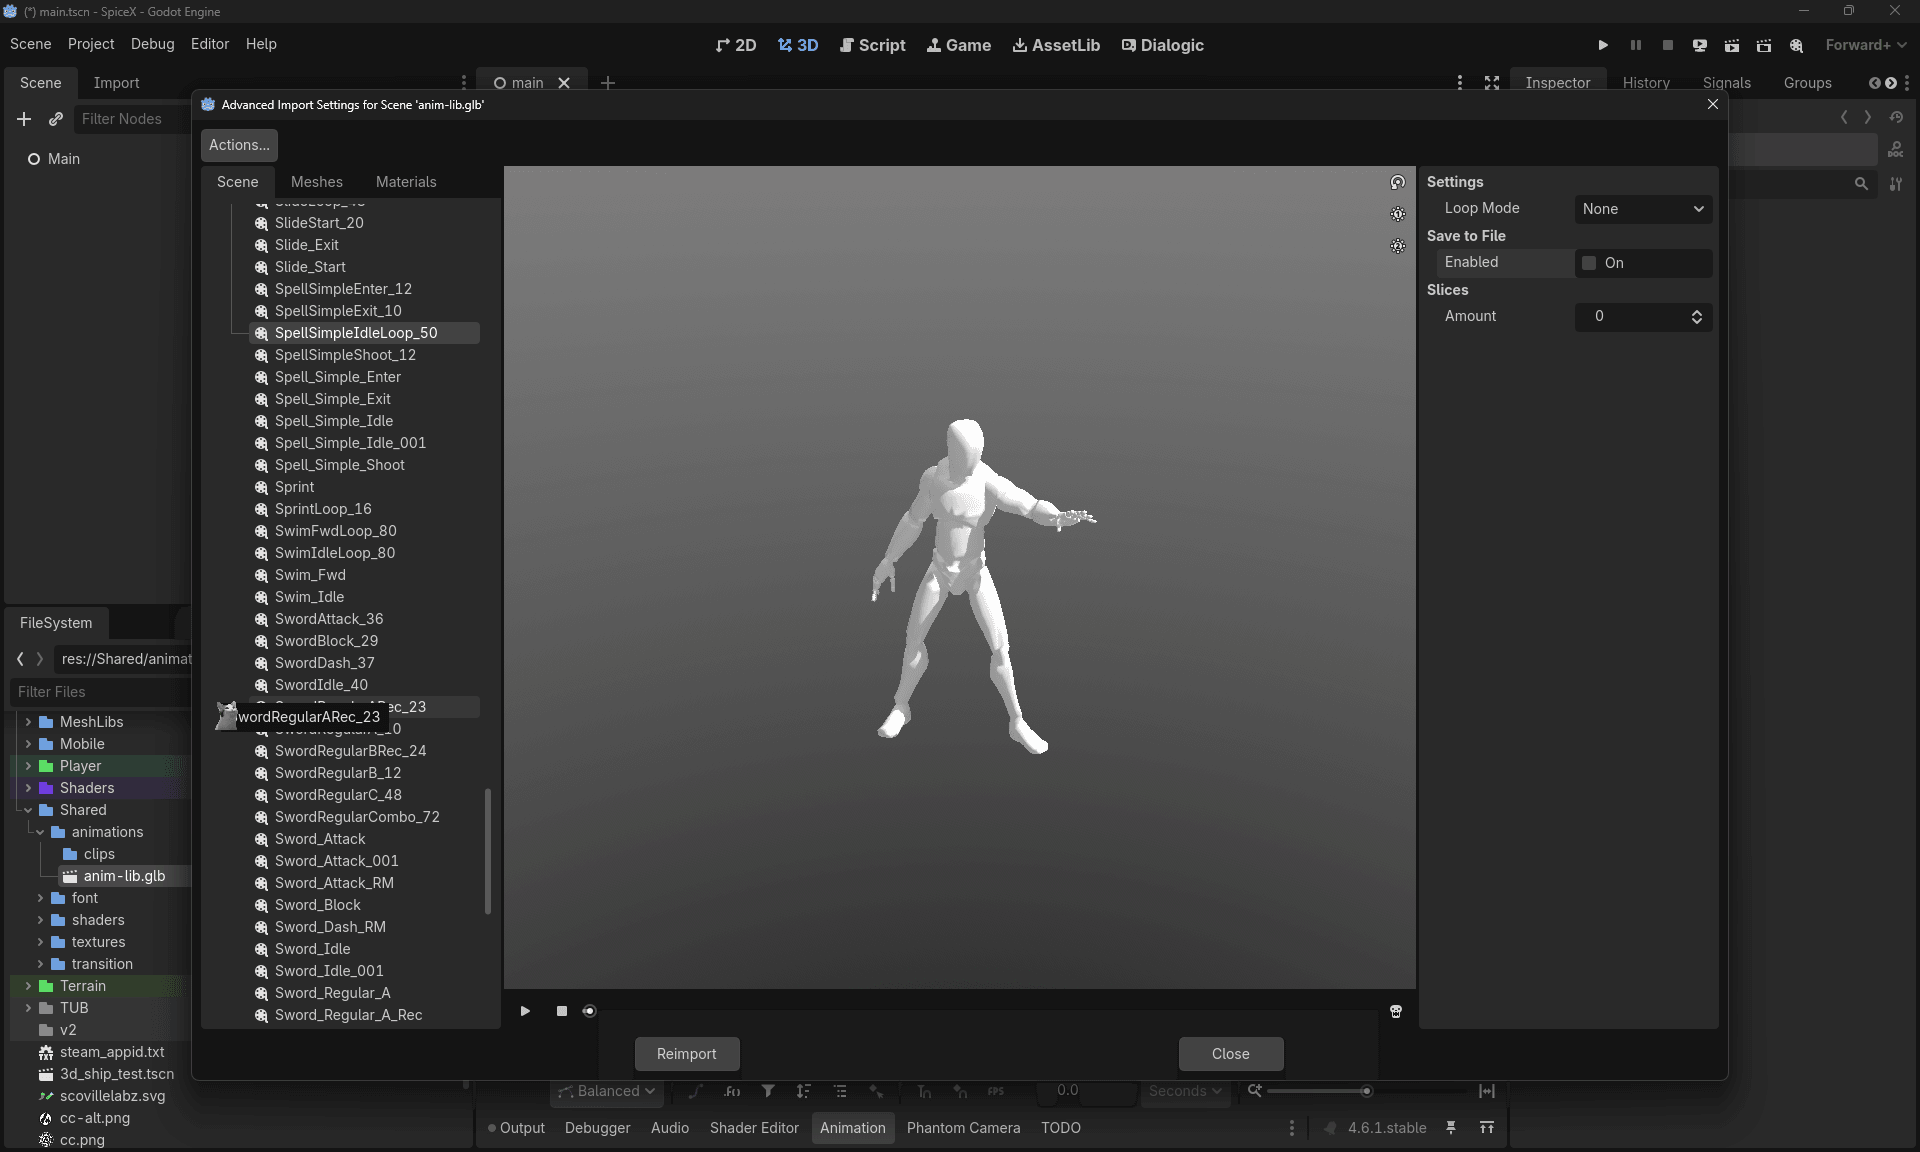
What’s happening in this screenshot:
Godot’s Advanced Import Settings for Scene dialog is open. The left panel shows the full animation list extracted from anim-lib.glb. I can see:
Slide_Start_20,Slide_Exit,SlideLoop_48— sliding animationsSpellSimpleEnter_12,SpellSimpleExit_10,SpellSimpleIdleLoop_50,SpellSimpleShoot_12— spell castingSprint,SprintLoop_16— runningSwimFwdLoop_80,SwimIdleLoop_80,Swim_Fwd,Swim_Idle— swimmingSwordAttack_36,SwordBlock_29,SwordDash_37,SwordIdle_40— sword combatSwordRegularA_10,SwordRegularB_12,SwordRegularC_48,SwordRegularCombo_72— combo attacks- …and all their
_RM(root motion) variants
The 3D viewport in the center shows a neutral T-posing mannequin — Godot’s default preview when no specific animation is playing. This is just a standard grey humanoid used for previewing.
The right panel shows import settings for the selected animation (SpellSimpleIdleLoop_50). Key settings:
- Loop Mode:
None(can be changed per-clip) - Save to File:
On(this is the magic toggle — extracts the clip as a.res) - Custom Track:
On - Slices:
0
Why extract as .res? Because .res files are Godot’s native binary format. They load faster than re-importing .glb every time, and they’re smaller on disk. When you toggle “Save to File,” Godot bakes that animation clip into a standalone resource you can reference anywhere in your project.
Step 4: Extracting Individual .res Clips
For each animation I actually want to use, I select it in the list, toggle “Save to File” to On, and click Reimport. Godot then extracts just that clip from the big library.
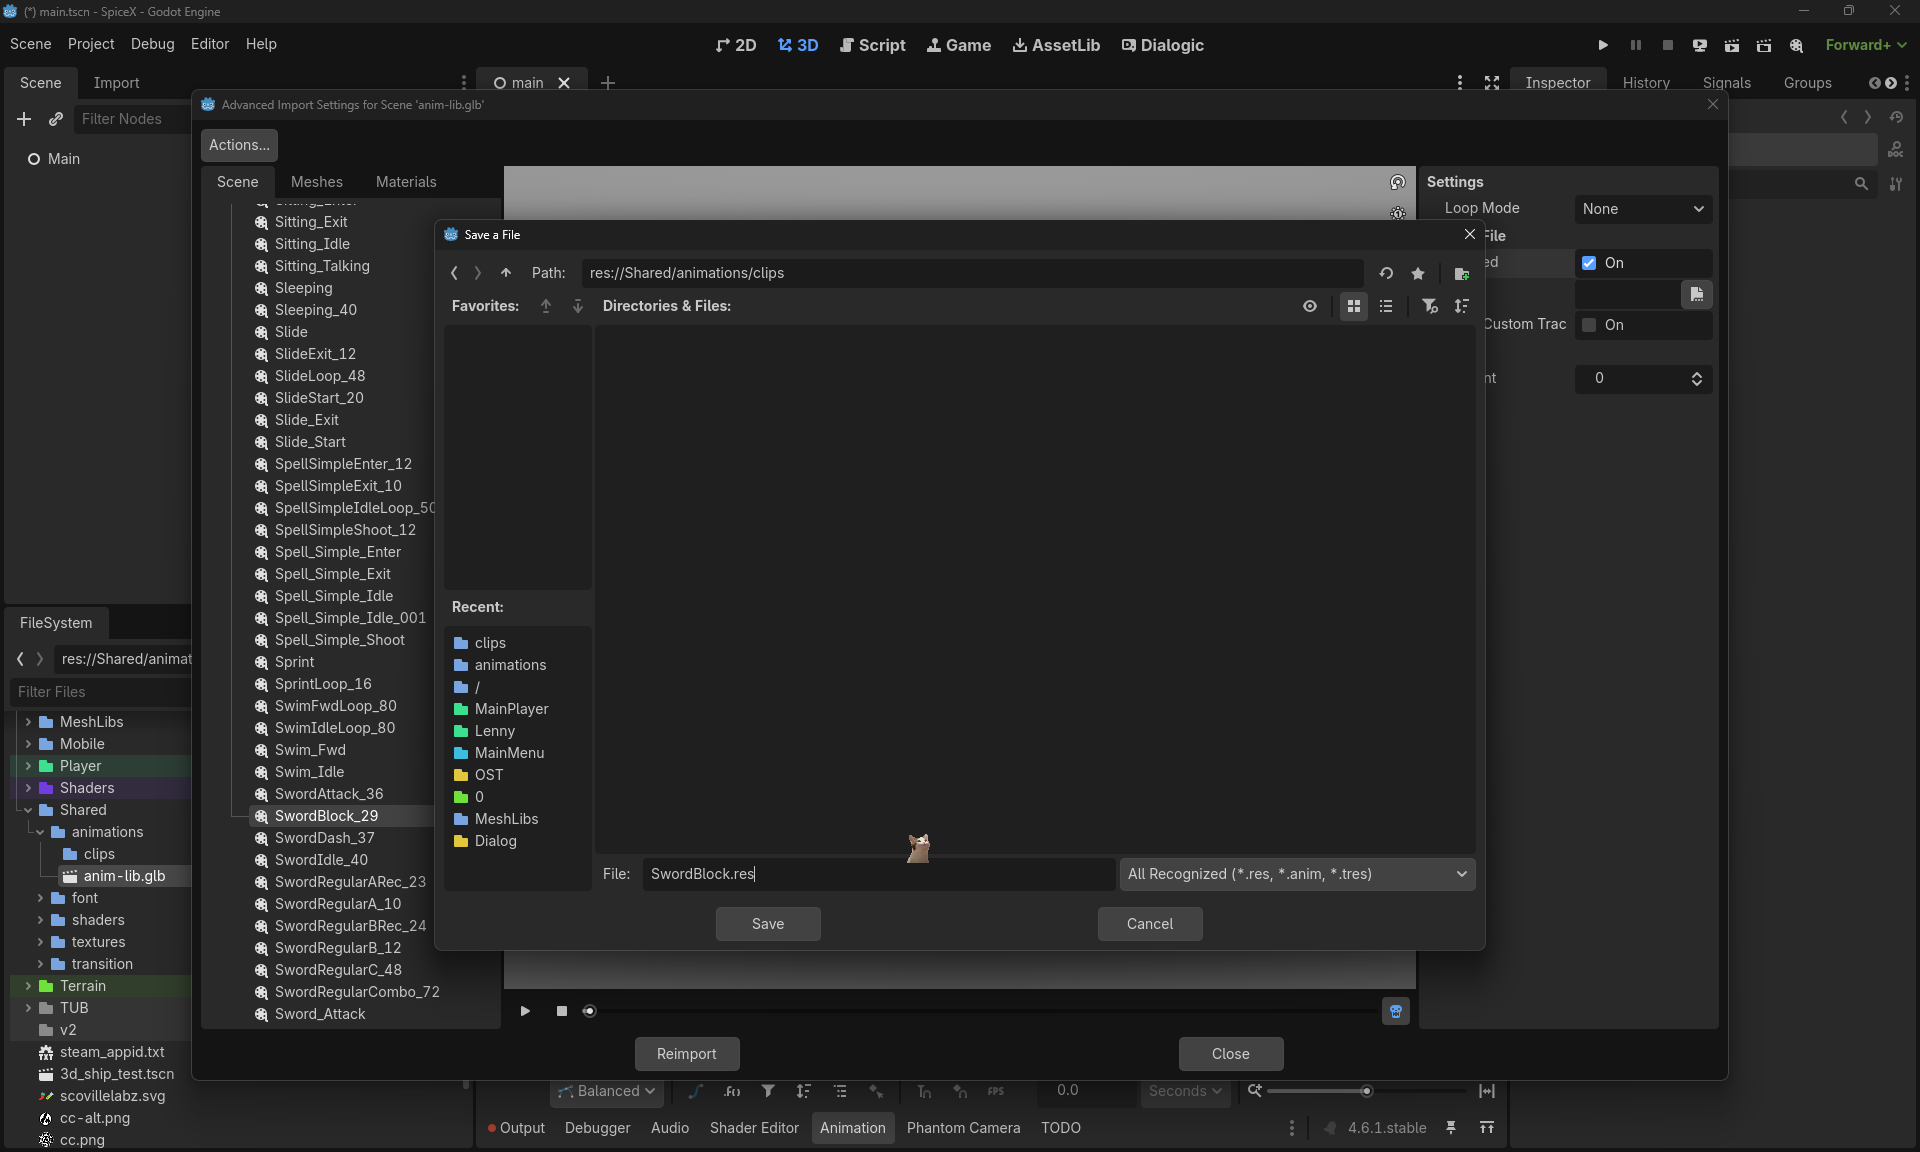
What’s happening in this screenshot:
The Save dialog is open, showing where the extracted clip will live:
- Path:
res://Shared/animations/clips - Filename:
SwordBlock.res - File type:
All Recognized (*.res, *.anim, *.tres)
Behind the dialog, the Advanced Import Settings shows SwordBlock_29 is the selected/highlighted animation in the list. The SwordBlock_29 entry corresponds to the filename in the save dialog.
This is the “one library, many clips” workflow in action. I keep anim-lib.glb as the master source, and extract only what I need into the /clips folder. If I ever need to update an animation, I fix it in Blender, re-export to the library, and re-extract the clips.
Step 5: Importing the Library Into the Project
After extracting clips, I double-click anim-lib.glb in the FileSystem dock to trigger the import process.
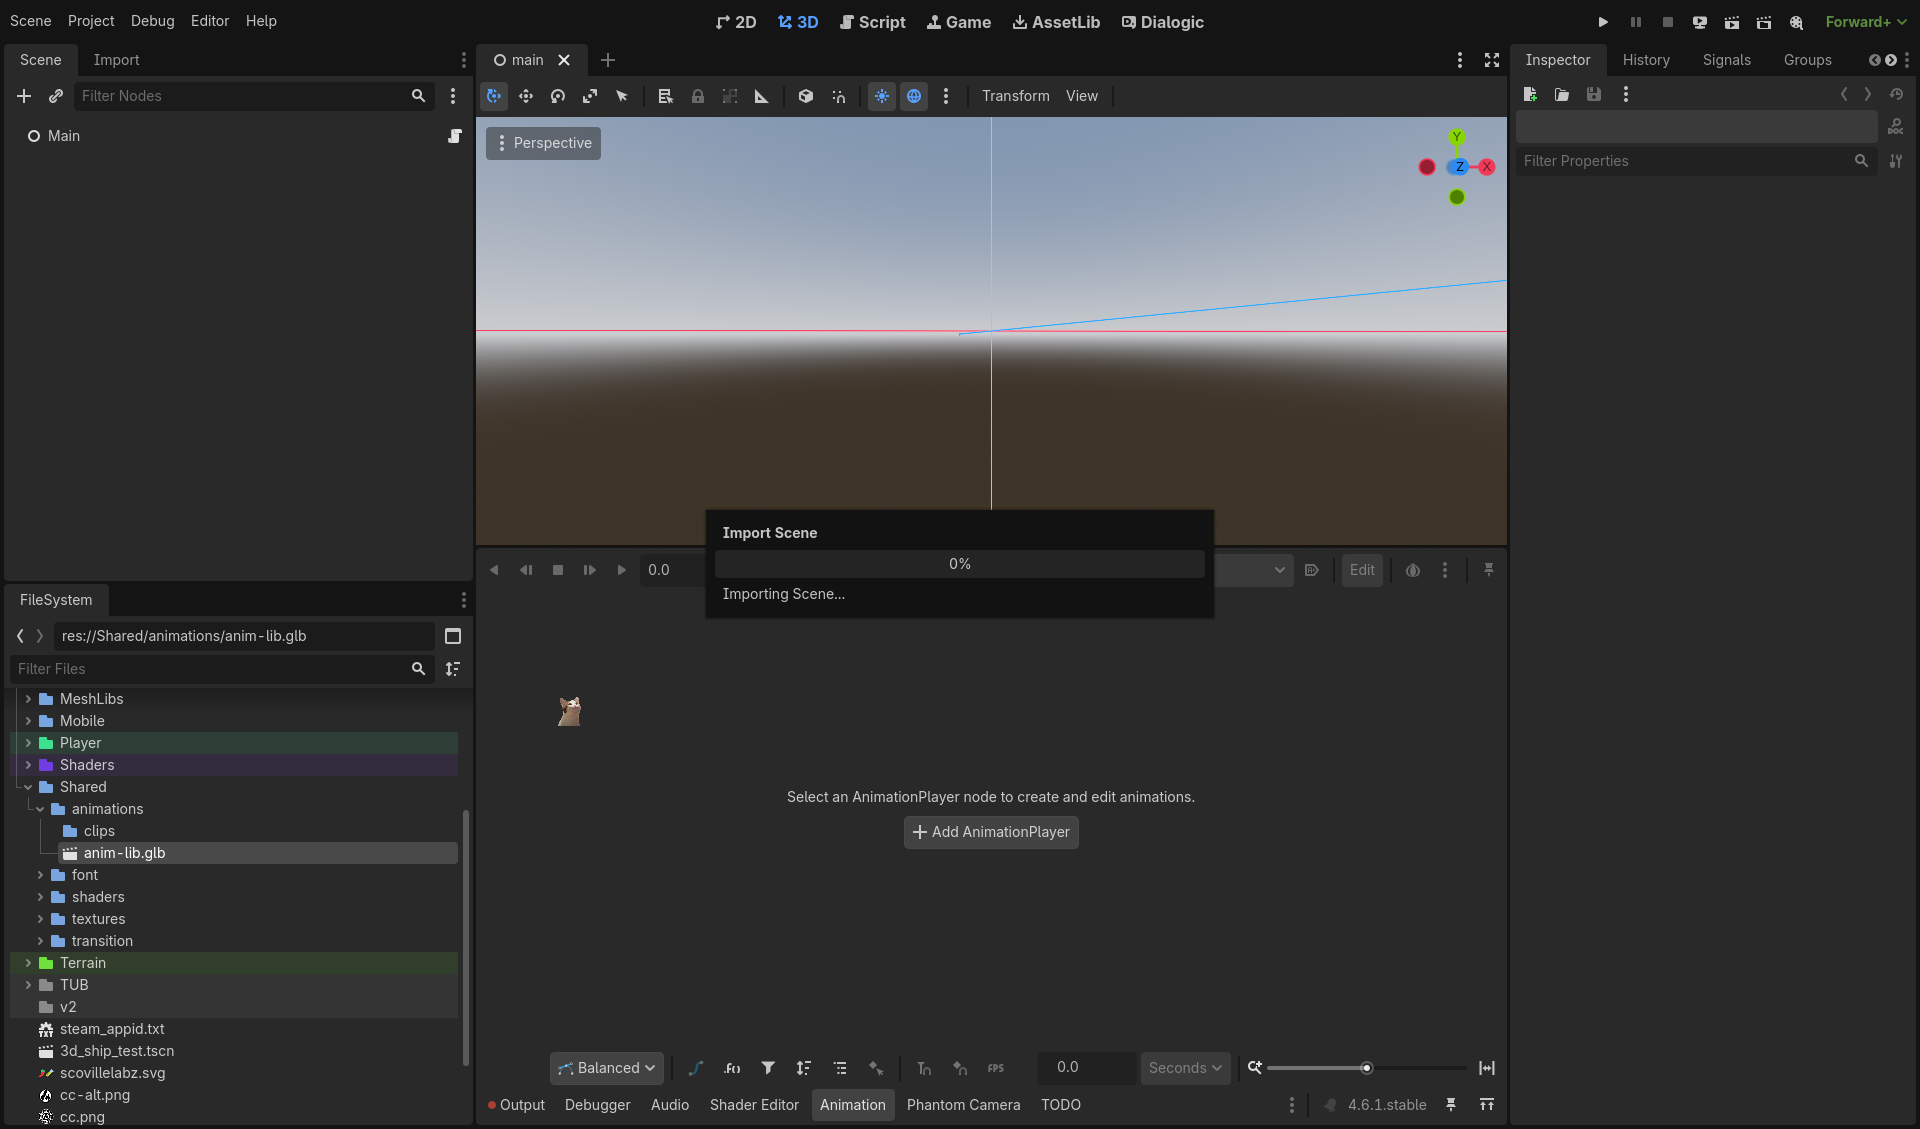
What’s happening in this screenshot:
Godot is actively importing the scene. The “Import Scene” modal shows:
- Progress bar at 0%
- Status: “Importing Scene…”
In the background, I clicked on anim-lib.glb in the FileSystem tree (res://Shared/animations/anim-lib.glb). This triggers the import pipeline that reads the GLB, processes the skeleton and animations, and makes them available in the project.
Patience is a virtue here. The 0% feels like forever because Godot is processing every bone, every keyframe, every track in that library. But once it’s done, it’s cached. Future imports are instant.
Step 6: The “Make Local” Trick
Here’s where shit gets spicy. 🔥
Cleetus is an instanced VRM scene imported via the VRM4U addon. By default, instanced scenes in Godot are read-only — you can’t add an AnimationPlayer or AnimationTree to someone else’s prefab. You can see it, you can place it, but you can’t wire it up.
The solution? Make Local.
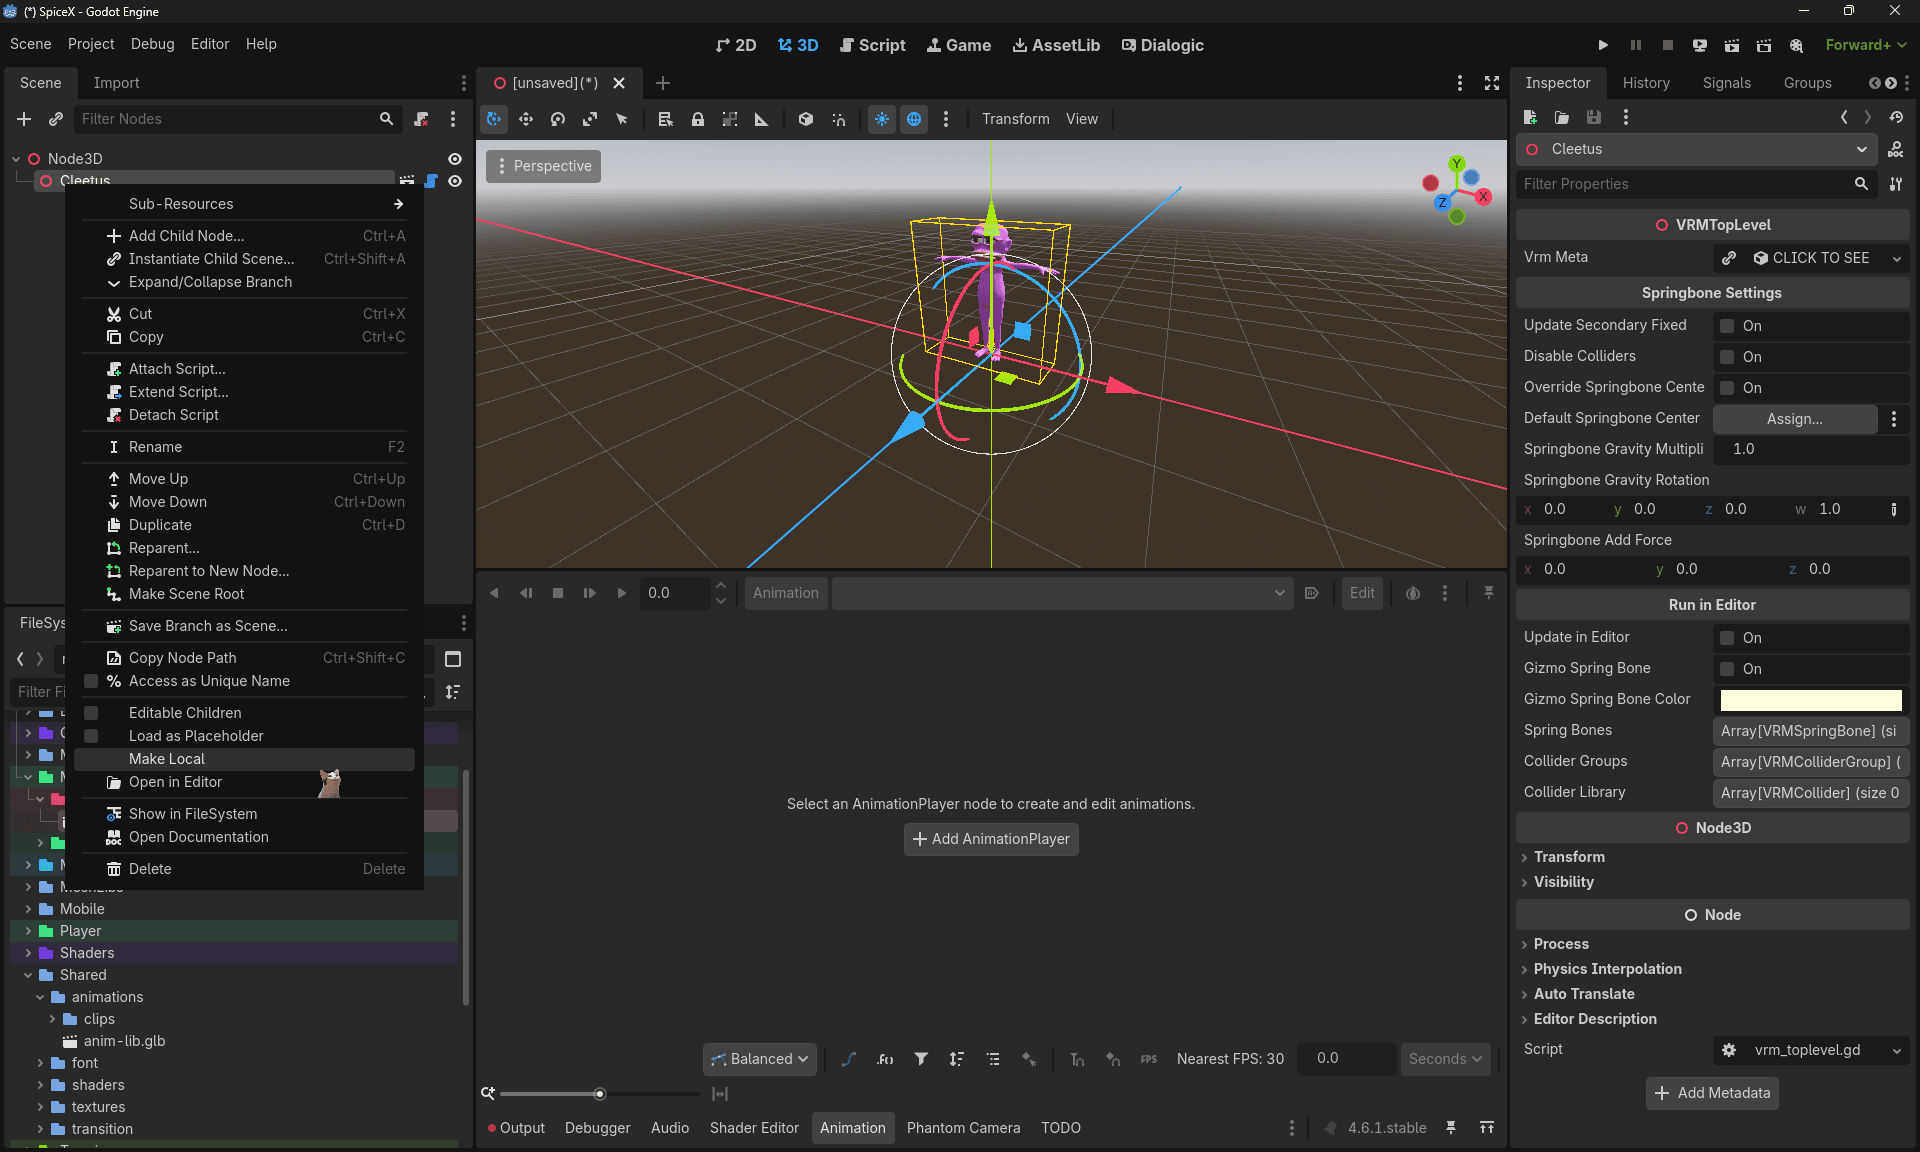
What’s happening in this screenshot:
The context menu is open on the “Cleetus” node in the scene tree. The node is a child of Node3D and appears to be an instanced scene (indicated by the icon). The menu shows various options including:
- Add Child Node
- Instantiate Child Scene
- Make Local (the option we need)
- Save Branch as Scene
- Editable Children (toggle)
- Load as Placeholder (toggle)
What “Make Local” does:
It breaks the instance link to the original .vrm file. Now the entire hierarchy — Cleetus → GeneralSkeleton → CleetusMesh → Head → LookOffset — is fully editable in our scene. We gain access to:
- The skeleton bone data
- The mesh skinning info
- The ability to add new nodes (like AnimationPlayer and AnimationTree)
The VRMTopLevel component (visible in the Inspector on the right) stays intact:
- Vrm Meta (with “CLICK TO SEE” dropdown)
- Springbone Settings (gravity, colliders, forces)
- Spring Bones array
- Collider Groups
Everything is preserved. But now we can layer our own animation system on top.
Step 7: Cleetus With Animations Applied
After making local and setting up the animation pipeline, we get to see the fruits of our labor.
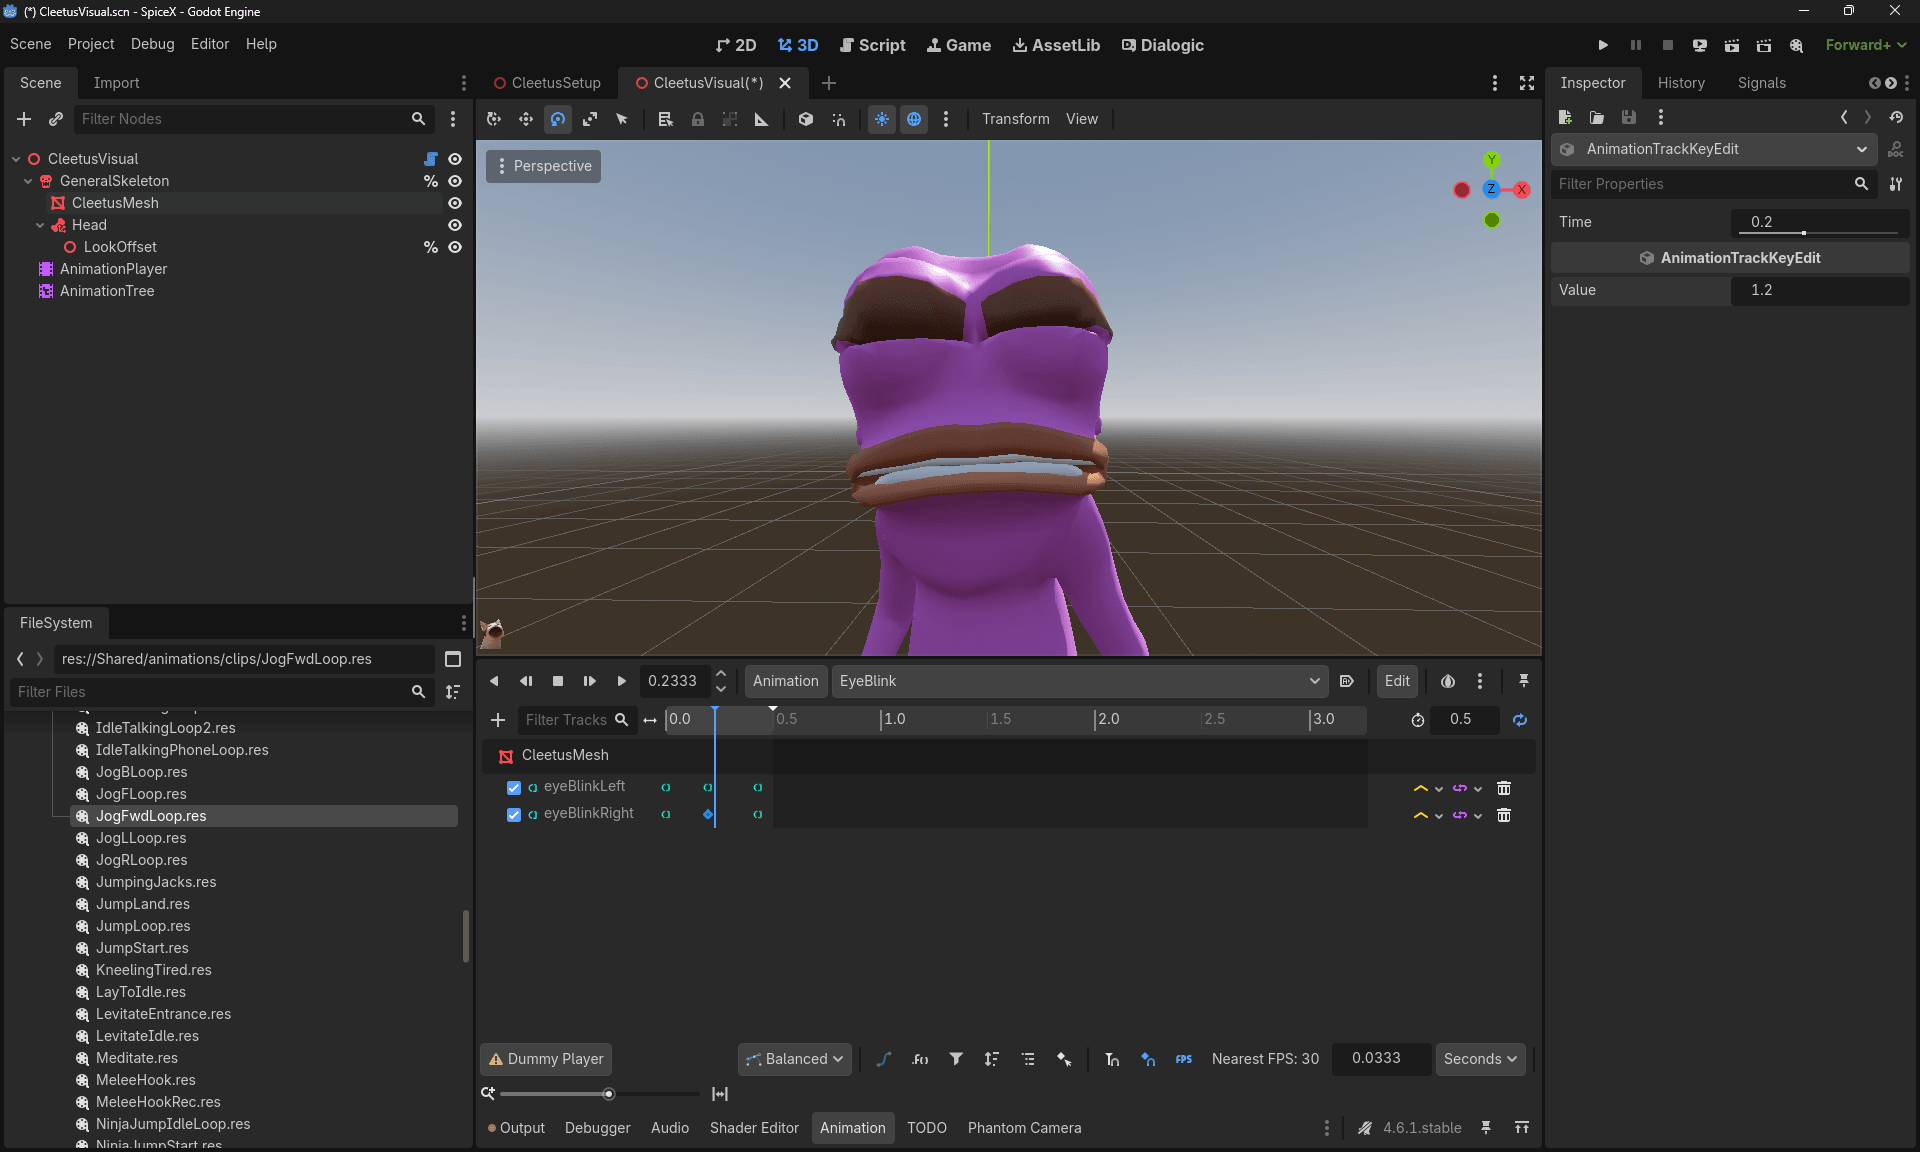
What’s happening in this screenshot:
Cleetus is now lying horizontally in a spread-eagle/diving pose — arms extended outward, legs straight back, facing downward toward the grid. This is the result of an animation clip being played on Cleetus’s skeleton.
The scene tree shows the full hierarchy:
- Cleetus (root)
- GeneralSkeleton (chain-link/skeleton icon)
- CleetusMesh (red mesh icon)
- Head (node icon)
- LookOffset (% symbol — indicates it’s a unique/internal node)
- AnimationPlayer (purple filmstrip icon)
- AnimationTree (filmstrip/tree icon)
- GeneralSkeleton (chain-link/skeleton icon)
The AnimationPlayer and AnimationTree are the new nodes we added after making Cleetus local.
At the bottom, the Animation panel shows:
- “Select an AnimationPlayer node to create and edit animations.”
- Button: “+ Add AnimationPlayer” (we already did this)
- Timeline controls
The FileSystem panel shows we’re in res://MainPlayer/C1337U5/Cleetus.vrm — Cleetus’s original VRM file. We also have Lenny.tscn in the same folder — another VRM character.
Why the spread-eagle pose? This is likely a resting/pose animation or one of the more stylized clips from the library. It’s proof that the retargeted skeleton data is flowing correctly through Cleetus’s joints.
Step 8: The Animation Tree
The final piece: wiring up all those extracted clips into a playable state machine.
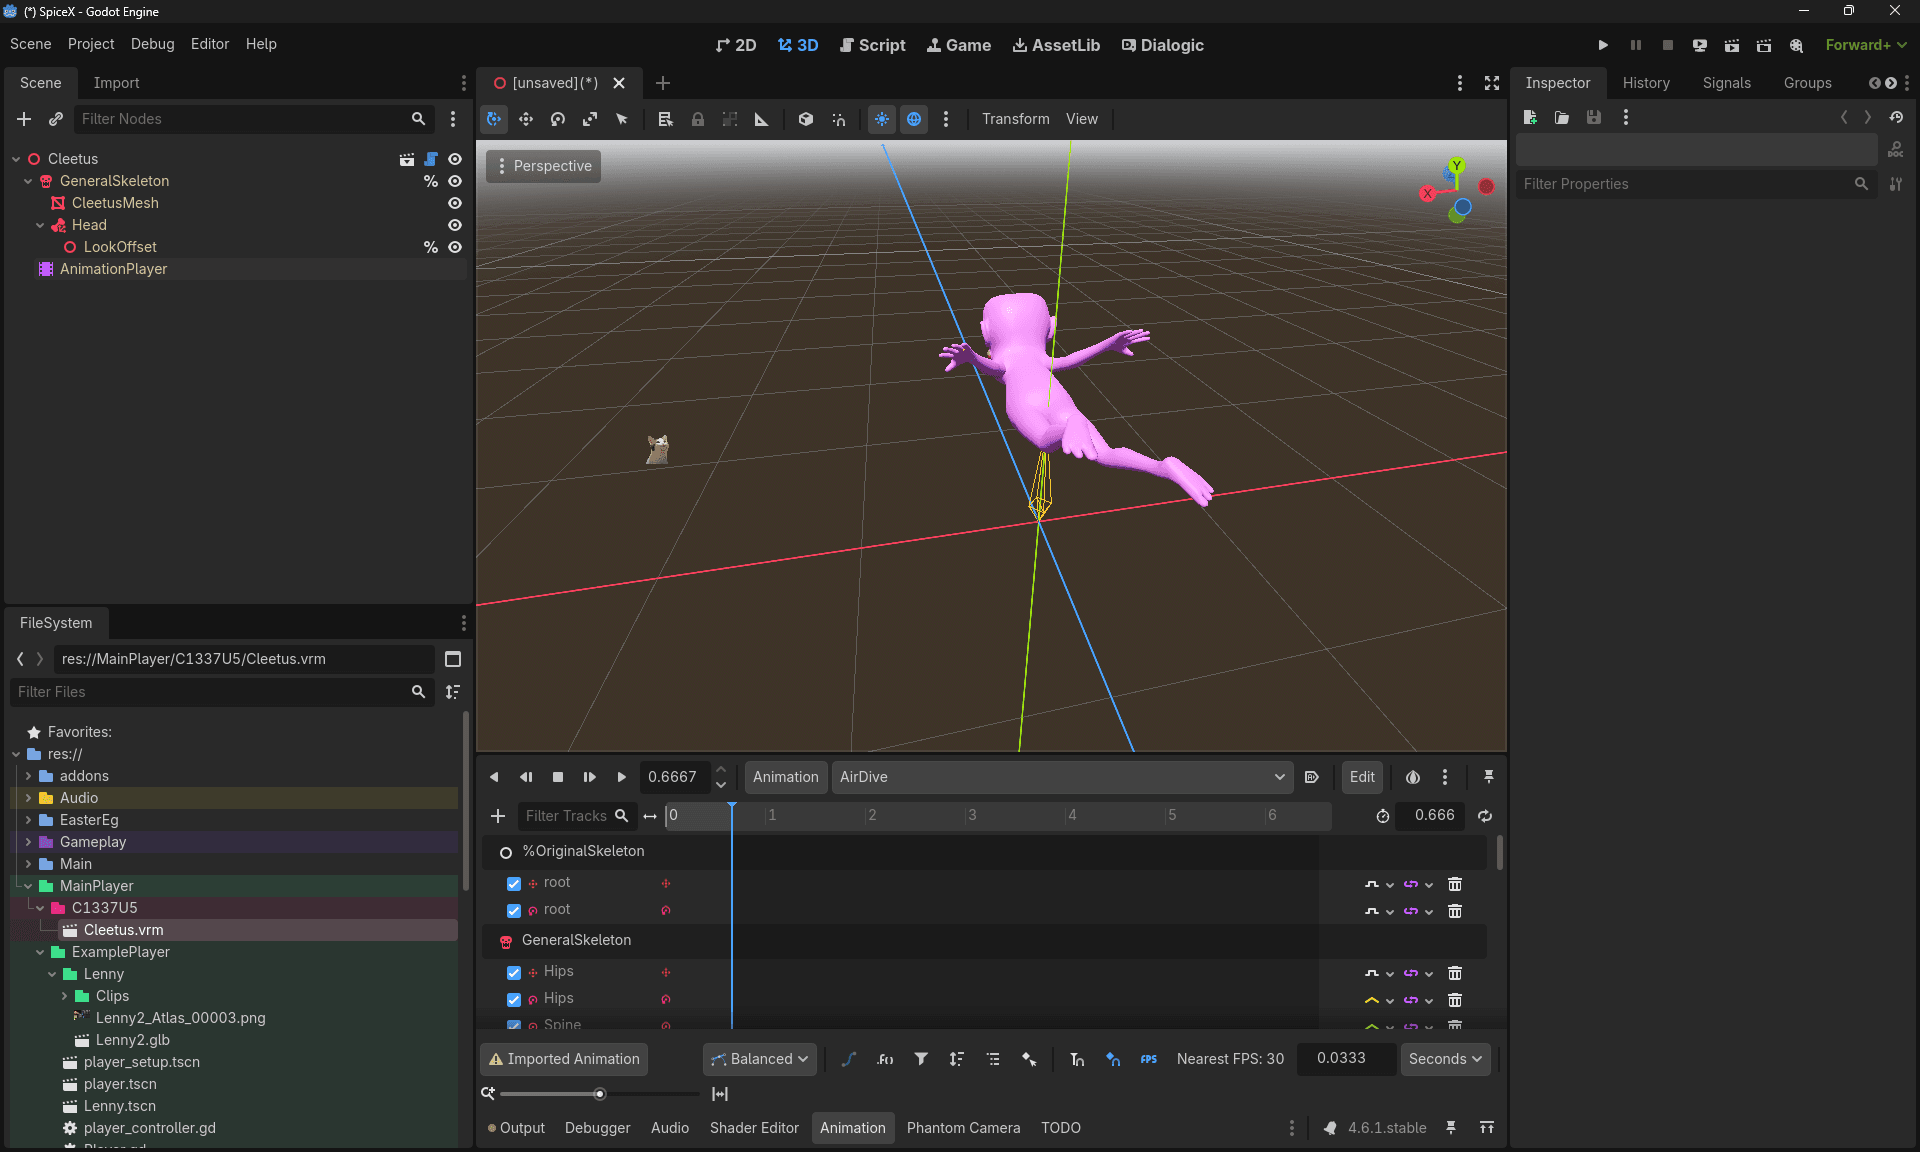
What’s happening in this screenshot:
We’re back in the CleetusVisual scene with the full hierarchy:
- CleetusVisual (root, orange circle)
- GeneralSkeleton
- CleetusMesh
- Head → LookOffset
- AnimationPlayer
- AnimationTree ← This is the new addition
The AnimationTree node is what handles blending between animation states. Instead of manually calling anim_player.play("idle") every time, we define a graph:
- Locomotion: idle → jog → sprint → swim (with blend spaces)
- Combat: sword idle → attack combos → block → dash
- Spells: enter → idle loop → shoot → exit
- Utility: sitting, meditating, jumping, picking stuff up
Each state crossfades into the next using Godot’s built-in blend times, so Cleetus never snaps between poses like a broken robot.
We also added a blink animation as a subtle layer on top of the idle state. Because even corporate escapees need to moisturize their eyeballs.
The FileSystem shows we’re in res://Shared/animations/clips/JogFwdLoop.res — one of our extracted clips ready to be referenced by the AnimationTree.
The Retargeting Summary
Here’s the full pipeline, start to finish:
Mesh2Motion Library (raw .glb)
    ↓
Blender NLA Editor (bone mapping, pose correction)
    ↓
Export individual clips (.glb, named with frame counts)
    ↓
Pack into anim-lib.glb (master library)
    ↓
Import into Godot (Advanced Import Settings)
    ↓
Extract clips as .res (Save to File → Reimport)
    ↓
Make Cleetus Local (break instance, gain edit access)
    ↓
Add AnimationPlayer + AnimationTree
    ↓
Wire up state machine with retargeted clips
    ↓
Cleetus runs, jumps, and swings swords 🎉
What We Learned
Retargeting Isn’t Magic — It’s Plumbing
There’s no single “retarget” button that makes everything work. It’s a pipeline of discrete steps: bone mapping, pose normalization, clip extraction, scene setup. Each step is simple. Chaining them together is the skill.
Godot’s “Make Local” is Underrated
Most tutorials skip over this. But if you’re working with instanced scenes (VRM imports, downloaded assets, team-built prefabs), you NEED to know about Make Local. Without it, you’re stuck with read-only nodes and can’t add animation systems.
.res Files Are Your Friends
Extracting animation clips as .res instead of keeping them embedded in .glb gives you:
- Faster load times
- Smaller file sizes
- Easier version control (binary diffs are cleaner)
- The ability to reference clips from multiple scenes
Frame Counts in Names Save Sanity
Naming clips like SwordBlock_29 instead of SwordBlock means you can calculate blend timing without opening the editor:
- “This block is 29 frames at 60fps, so it’s ~0.48 seconds”
- “I want a 0.1 second crossfade, that’s 6 frames of overlap”
The Result
Cleetus is no longer a T-posing prisoner of the SpiceX labs.
He runs. He jumps. He swings a sword, casts spells, pulls a pistol, and sits down to rest after a long day of being a corporate experiment. All from free Mesh2Motion data, retargeted through Blender’s NLA editor, imported into Godot 4.6, and wired up through a proper animation state machine.
The whole pipeline took a weekend to figure out. Now it takes about 10 minutes to retarget and import a new animation.
That’s the power of building systems instead of one-offs.
“They gave me a skeleton and a dream. Now I’ve got 40+ retargeted animations and a mean sword combo.”
— Cleetus 🤡
Links:
- Mesh2Motion — Free animation retargeting and motion dataset
- VRM4U for Godot — VRM avatar support plugin
- SpiceX Animation Clip Library — Our previous post on organizing clips
- dockyardrift — Cleetus’s other home (Lobby SDK world)
- SpiceX Devlog Series — More SpicyX gamedev shenanigans